

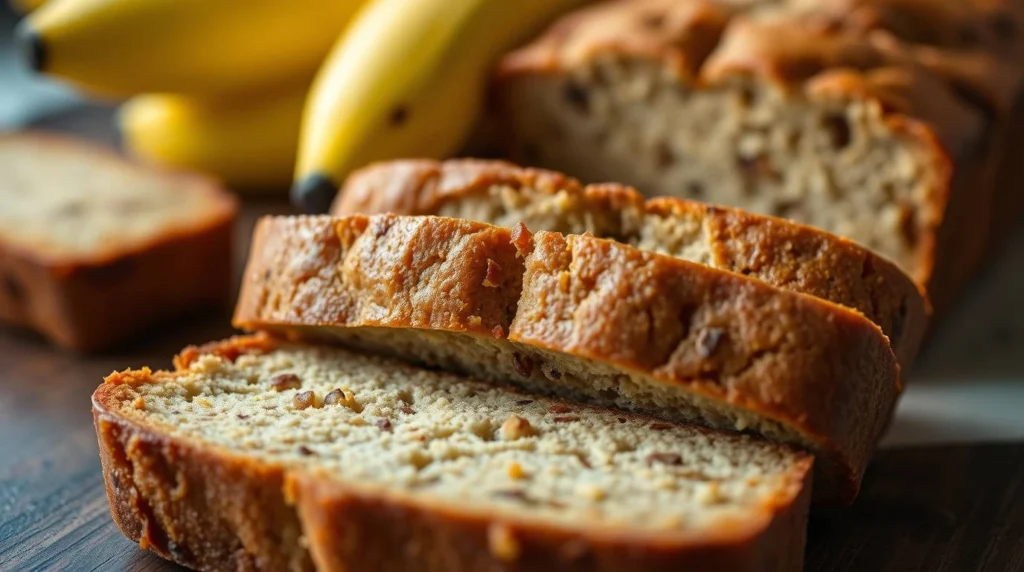
Banana bread is a timeless classic—warm, fluffy, and packed with sweet banana flavor. Whether you’re a beginner or an experienced baker, this easy banana bread recipe guarantees perfect results every time. With just a handful of simple ingredients, you can create a moist, tender loaf that’s perfect for breakfast, snacking, or even dessert.
The best part? This recipe is completely foolproof! No complicated steps, no fancy equipment—just ripe bananas, pantry staples, and a little bit of mixing. Plus, you can easily customize it with walnuts, chocolate chips, or a dash of cinnamon for extra flavor.
Ready to bake the best banana bread ever? Let’s get started.
Why You’ll Love This Easy Banana Bread Recipe.
Visit The Spruce Eats for Delicious Recipes and Cooking Tips
Moist & Fluffy Texture: Thanks to the Right Balance of Ingredients:
One of the biggest challenges when making banana bread is getting the perfect texture—moist, soft, and fluffy without being too dense or dry. The secret lies in using the right balance of ingredients and following a few key baking techniques.
1. The Role of Ripe Bananas
The more ripe the bananas, the better your banana bread will be. Overripe bananas are naturally sweeter and contain more moisture, which helps create a soft, tender crumb. Their mushy texture also ensures they blend seamlessly into the batter, adding both flavor and richness.
2. The Right Ratio of Wet & Dry Ingredients
Achieving the perfect banana bread texture depends on balancing moisture and structure.
- Wet Ingredients (Eggs, Butter, and Bananas): These provide fat and moisture, keeping the loaf soft and tender.
- Dry Ingredients (Flour, Baking Powder, and Baking Soda): These give the bread structure and lift, ensuring it stays fluffy rather than dense.
Adding too much flour can make the bread dry, while too much liquid can make it heavy and soggy. Sticking to the correct measurements ensures a moist yet light texture.
3. Avoid Overmixing the Batter
Overmixing is one of the most common mistakes that can lead to tough, dense banana bread. When you overmix, the gluten in the flour develops too much, making the bread chewy instead of soft. To prevent this, mix just until the ingredients are combined—it’s okay if there are a few small lumps in the batter!
4. The Perfect Baking Temperature & Time
For evenly baked banana bread, aim for an oven temperature between 325°F and 350°F (163°C to 177°C). This range lets the middle cook through while keeping the edges from drying out. A slow and steady bake creates a golden-brown crust while keeping the inside moist and fluffy.
By carefully following these steps and using the right balance of ingredients, you’ll achieve a perfectly moist, soft, and fluffy banana bread every time!
Foolproof & Beginner-Friendly: Simple Steps with No Complicated Techniques:
One of the best things about banana bread is how easy and forgiving it is, making it the perfect recipe for both beginners and experienced bakers alike. Unlike some baked goods that require precise techniques or special equipment, this banana bread recipe follows simple, straightforward steps that anyone can master.
1. No Fancy Equipment Needed
Unlike cakes or pastries that might require stand mixers, pastry cutters, or rolling pins, banana bread only needs basic kitchen tools:
- A mixing bowl for combining the ingredients
- Use a fork or whisk to mash the bananas and blend the batter together.
- A loaf pan for baking
- An oven—that’s it! No complicated techniques like kneading or folding are required.
2. Simple, Easy-to-Find Ingredients
This recipe uses common pantry staples like flour, eggs, sugar, butter, and, of course, ripe bananas. You don’t need specialty flours, hard-to-find flavorings, or advanced baking skills—just basic ingredients that most people already have at home.
3. Just Mix and Bake – No Special Techniques Required
Unlike some recipes that require careful layering or specific mixing methods, banana bread batter comes together in just a few steps:
- Mash the Bananas – Use a fork or a potato masher; they don’t need to be perfectly smooth.
- Mix the Wet Ingredients – Combine eggs, butter, sugar, and mashed bananas in a bowl.
- Mix the Dry Ingredients Separately – Flour, baking soda, and salt should be whisked together before adding to the wet mixture.
- Combine Everything Gently – Stir until just combined—no need for vigorous mixing!
- Pour and Bake – Transfer the batter to a loaf pan and let the oven do the work.
That’s it! No advanced baking knowledge or complicated methods are required—just mix, pour, and bake.
4. Hard to Mess Up – Perfect for First-Time Bakers
Even if you’re new to baking, this recipe is nearly fail-proof. Unlike cakes that can sink in the middle or cookies that can burn quickly, banana bread is very forgiving:
Even if you slightly overmix, the bread will still turn out delicious. Overripe bananas actually work better for flavor and moisture! And if you forget an ingredient like cinnamon or vanilla, don’t worry—the bread will still be great.
With no tricky techniques or precise timing required, this banana bread recipe is truly foolproof—the perfect choice for beginners who want a delicious, homemade treat without any stress!
Customizable: Add Walnuts, Chocolate Chips, or Cinnamon for Extra Flavor:
One of the best things about banana bread is how easily you can customize it to suit your taste. Whether you love the crunch of nuts, the sweetness of chocolate, or the warmth of cinnamon, a few simple additions can elevate your banana bread to the next level. Here’s how you can personalize your loaf while keeping it just as easy and foolproof!
1. Add Walnuts for a Crunchy, Nutty Twist
If you love a bit of crunch in your baked goods, chopped walnuts are a great addition. They add a slightly toasted, nutty flavor that pairs perfectly with the soft, moist texture of banana bread.
How to Add Walnuts:
- Use ½ to ¾ cup of chopped walnuts for a balanced crunch.
- Lightly toast them in a dry pan for a few minutes before adding them to the batter for extra depth of flavor.
- Gently stir them in at the end to make sure they’re spread out evenly.
Alternative Nuts: You can swap walnuts for pecans, almonds, or hazelnuts for a different flavor profile.
2. Chocolate Chips for a Sweet, Decadent Upgrade
For those who love a hint of sweetness in every bite, chocolate chips are the perfect addition. They melt into the banana bread as it bakes, creating little pockets of rich, gooey chocolate goodness.
How to Add Chocolate Chips:
- Stir in ½ to ¾ cup of semi-sweet, milk, or dark chocolate chips for the perfect balance of sweetness.
- Lightly coat the chocolate chips with a teaspoon of flour before adding them—this helps prevent them from sinking to the bottom.
- Sprinkle extra chocolate chips on top before baking for an eye-catching presentation.
Alternative Chocolate Add-ins: White chocolate chips or dark chocolate chunks can add a different level of sweetness and depth.
3. Cinnamon for a Warm, Spiced Flavor
Just a touch of cinnamon can really elevate the flavor of banana bread. It adds warmth and a touch of spice that complements the natural sweetness of bananas.
How to Add Cinnamon:
- Add 1 to 1.5 teaspoons of ground cinnamon to the dry ingredients.
- Combine it with a pinch of nutmeg or allspice for a more complex spiced flavor.
- Swirl in a cinnamon-sugar mixture before baking for a marbled effect.
Alternative Spices: Try adding pumpkin spice, cardamom, or ginger for a seasonal twist!
4. Other Fun Variations & Add-Ins
Feeling creative? Here are more ways to customize your banana bread:
- Coconut Flakes – Adds a tropical touch and extra texture.
- Peanut Butter Swirl – Swirl in 2–3 tablespoons of peanut butter before baking for a nutty, creamy surprise.
- Dried Fruits – Raisins, cranberries, or chopped dates add natural sweetness and chewiness.
- Lemon Zest or Orange Zest – A bit of citrus zest adds brightness to balance the sweetness.
The Best Part? You Can Mix & Match!
The beauty of banana bread is that you don’t have to stick to just one add-in. Try combining different flavors for a truly unique and delicious loaf:
Walnuts and cinnamon – a timeless combo that brings cozy, comforting flavor.
Chocolate Chip + Coconut – Sweet and tropical.
Cinnamon + Pecans + Nutmeg – A fall-inspired delight.
Peanut Butter Swirl + Chocolate Chips – Rich and indulgent.
Final Tip: Keep the Balance Right
While it’s fun to experiment, be mindful of the total amount of mix-ins you add. Adding too many mix-ins can weigh down the batter and affect its texture. A good rule of thumb:
- Stick to ½ – ¾ cup total of mix-ins for the best texture.
- Stir them in carefully at the end to prevent overmixing the batter.
Personalizing banana bread lets you add your own twist without making the recipe any more complicated. Whether you prefer it crunchy, chocolatey, or spiced, these simple additions will take your banana bread to a whole new level of deliciousness.
Perfect for Any Occasion: Breakfast, Snacks, or Dessert:
Banana bread isn’t just delicious—it’s one of the most adaptable baked goods you can make! This easy banana bread recipe is perfect for any occasion, whether you need a quick breakfast, a filling snack, or a comforting dessert. Its soft, moist texture and rich flavor make it a timeless favorite that can be enjoyed any time of day, anywhere.
1. A Quick & Nutritious Breakfast Option
Mornings can be hectic, and sometimes there’s simply no time for a full meal. That’s when banana bread shines—it’s the perfect grab-and-go breakfast that’s both filling and flavorful.
Why It’s Ideal for Breakfast:
- Ripe bananas bring their own sweetness, so there’s no need to add extra sugar.
- A mix of bananas, eggs, and flour gives you a balance of carbs and protein to fuel your day.
- Pair it with coffee, tea, or milk for a wholesome morning treat.
Ways to Enjoy Banana Bread for Breakfast:
- Toast a slice and spread butter, cream cheese, or nut butter for an extra boost of flavor.
- Enjoy it alongside Greek yogurt and fresh fruit for a more complete meal.
- Transform it into French toast by dipping slices in an egg mixture and frying them!
2. A Satisfying Snack Anytime
Need a quick energy boost between meals? Banana bread is the perfect snack, offering both satisfying flavors and lasting energy. Unlike store-bought snacks that often contain preservatives, this homemade banana bread is made with wholesome ingredients to keep you feeling full and satisfied.
Why It’s a Great Snack:
- It’s portable, making it easy to take to work, school, or on the go.
- Satisfies sweet cravings without being overly sugary.
- It’s an ideal match with coffee, tea, or even a protein shake for a midday boost.
Ways to Enjoy It as a Snack:
- Spread peanut butter or almond butter on top for added protein.
- Serve with a handful of nuts or dried fruit for a more filling bite.
- Enjoy it warm or cold—it’s delicious either way!
3. A Comforting & Light Dessert
Craving something sweet after dinner? Banana bread easily doubles as a light dessert. It’s naturally sweet, making it a perfect alternative to heavier cakes or pastries.
Why It’s Perfect for Dessert:
- It’s not too rich, making it a great option after a hearty meal.
- You can top it with extras to make it even more special.
- Pairs wonderfully with tea, coffee, or a scoop of ice cream!
Ways to Serve Banana Bread for Dessert:
- Drizzle honey or maple syrup over the top for a naturally sweet touch.
- Serve warm with a scoop of vanilla or caramel ice cream for a decadent treat.
- Add a chocolate glaze or a light dusting of powdered sugar for a bakery-style finish.
4. Ideal for Sharing & Special Occasions
Banana bread isn’t just for you—it’s also great to share with family and friends! It makes a thoughtful homemade gift for holidays, birthdays, or other special occasions.
Why It’s Great for Sharing:
- It’s easy to bake in large batches and share as a homemade gift.
- Customize it with various add-ins like nuts, chocolate, or spices to please everyone’s taste.
- It’s perfect for potlucks, brunches, and parties—everyone loves a fresh loaf of banana bread!
Ideas for Special Occasions:
- Bundle a loaf in parchment paper and secure it with a ribbon for a thoughtful homemade gift.
- Use banana bread as the base for a layered banana cake with cream cheese frosting, perfect for brunch or gatherings.
Final Thoughts: A Versatile Treat for Any Occasion
No matter the event, banana bread is always a winner. Whether you enjoy it as a quick breakfast, a satisfying snack, a light dessert, or a treat to share, this foolproof recipe ensures moist, fluffy, and delicious banana bread every time.
So next time you have overripe bananas, don’t hesitate—make this versatile and crowd-pleasing treat!p a loaf and enjoy it anytime, anywhere.
Ingredients You’ll Need.
Ripe Bananas: The Secret to Natural Sweetness and Moisture.
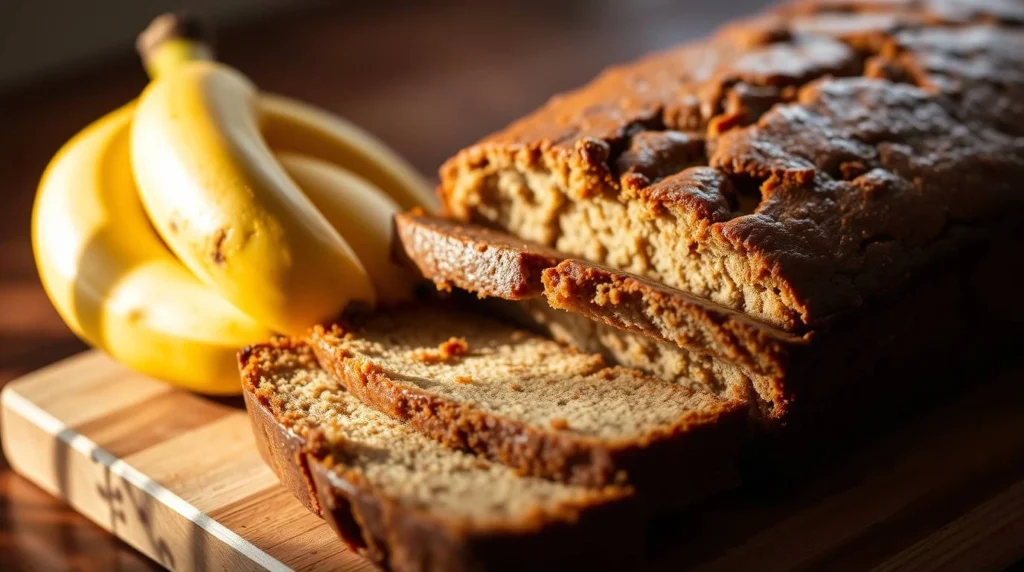
The key to making the best banana bread lies in one simple ingredient—ripe bananas! Not only do they provide a natural sweetness, but they also add moisture, softness, and flavor to the bread. If you’ve ever wondered why some banana bread turns out dry or bland while others are rich and tender, the answer often comes down to how ripe your bananas are.
1. Why Ripe Bananas Are Essential
As bananas ripen, their starches break down into natural sugars, giving them a sweeter taste and softer texture. This makes them perfect for baking because:
Sweeter Flavor: The natural sugars intensify as bananas ripen, reducing the need for added sugar in the recipe.
Softer Texture: Overripe bananas mash easily and blend smoothly into the batter, ensuring a moist and fluffy crumb.
Better Aroma & Taste: The deeper banana flavor enhances the overall richness of the bread.
2. How to Identify the Perfect Bananas for Banana Bread
Not all ripe bananas are the same! Here’s how to tell when they are just right for baking:
- Underripe (Green to Yellow): Too firm and not sweet enough for banana bread. Best for snacking.
- Perfectly Ripe (Yellow with Brown Spots): Ideal for baking—sweet, soft, and easy to mash.
- Overripe (Mostly Brown or Black): Super soft, intensely sweet, and full of banana flavor—perfect for ultra-moist banana bread!
Pro Tip: If your bananas are almost entirely black but not moldy, they are still great for baking! The darker they are, the more intense their sweetness will be.
3. How to Quickly Ripen Bananas If They’re Not Ready Yet
Craving banana bread but your bananas aren’t ripe enough? No worries! Try these quick ripening methods:
1. Oven Method (Fastest – 15 Minutes)
If you need ripe bananas right away:
- Preheat your oven to 300°F (150°C).
- Place unpeeled bananas on a baking sheet.
- Bake for 15–20 minutes, or until the peels turn completely black.
- Let them cool, then peel and mash!
2. Paper Bag Method (Overnight)
If you have a little more time:
- Place bananas in a brown paper bag with an apple or ripe banana.
- Close the bag and leave it at room temperature.
- By the next day, they should be softer and sweeter!
3. Microwave Method (Quick Fix – 30 Seconds)
For bananas that are firm but close to ripe:
- Peel the banana and place it on a microwave-safe plate.
- Heat in 10-second intervals, mashing gently between each.
- Repeat until soft and mushy.
4. What If My Bananas Are Too Ripe? Can I Still Use Them?
Absolutely! Even if your bananas look almost too far gone, they are still perfect for banana bread—as long as they aren’t moldy or leaking liquid. The more ripe they are, the more moisture and sweetness they add to your bread.
Pro Tip: If you have too many ripe bananas at once, freeze them for later use!
- Peel and slice the bananas before freezing for easy use.
- Store in an airtight bag for up to 3 months.
- Thaw before using in banana bread—frozen bananas may release extra liquid, so drain excess water if needed.
5. How Many Bananas Should You Use?
The number of bananas you use directly affects the texture and flavor of your bread:
- 2 Bananas: A mild banana flavor and a lighter texture.
- 3 Bananas: A classic banana bread taste with perfect moisture.
- 4 Bananas: An ultra-moist, dense, and intensely banana-flavored loaf.
Best Ratio: Most recipes (including this one) call for 3 medium bananas to achieve the perfect balance of sweetness, moisture, and structure.
Final Thoughts: The Secret Ingredient for Perfect Banana Bread
Ripe bananas are the heart and soul of any banana bread recipe. They provide natural sweetness, ensure a moist and fluffy texture, and enhance the overall flavor without needing extra sugar or dairy.
So, next time you see those brown, spotted bananas on your counter, don’t throw them away—turn them into a warm, delicious loaf of banana bread instead.
All-Purpose Flour & Baking Agents: To Create the Perfect Rise:
When it comes to banana bread, the right flour and baking agents are crucial for achieving the perfect rise and texture. These ingredients may seem simple, but they play a key role in making your banana bread light, fluffy, and perfectly textured. Understanding how to use all-purpose flour and the correct baking agents (like baking soda and baking powder) will help you create a loaf that rises beautifully and has a soft, moist crumb every time.
1. The Role of All-Purpose Flour: A Versatile Base
All-purpose flour is the go-to flour for most baked goods, including banana bread. It has the right balance of protein (gluten) and starch to create a sturdy structure without being too dense or too light. This makes it ideal for providing the perfect crumb and texture in banana bread.
Why All-Purpose Flour Works Well for Banana Bread:
- Balanced Protein Content: All-purpose flour has a moderate amount of gluten-forming proteins, which allows the bread to hold its shape while still being soft and tender.
- Versatility: It works in almost every type of baked good, offering a neutral flavor that lets the bananas and other flavors shine through.
- Moisture Absorption: It helps absorb the moisture from the bananas, eggs, and other wet ingredients, contributing to the right texture without making the bread too wet or too dry.
If you’re looking for a slightly denser, richer bread, you can try substituting up to 25% whole wheat flour for a heartier texture and flavor.
2. The Power of Baking Agents: Baking Soda & Baking Powder
Baking agents are essential for helping banana bread rise and become light and fluffy. Unlike cakes, which can require precise measuring of leavening agents, banana bread is forgiving. However, using the right baking agents in the correct amounts is crucial for achieving the ideal texture. Let’s break down the two most common ones: baking soda and baking powder.
Baking Soda: The Key to Moisture and Rise
Baking soda is a base that needs an acidic ingredient to activate it, and fortunately, ripe bananas are naturally acidic! When you mix baking soda with the acidic bananas, it releases carbon dioxide bubbles that help the batter rise and become fluffy.
Why Baking Soda Works:
- It reacts with the acidity of the bananas, creating bubbles that provide lift to the batter.
- It contributes to the moisture retention of banana bread, helping to keep it soft and tender.
- Baking soda is essential in banana bread recipes because of its immediate leavening action, helping the bread rise quickly while baking.
Baking Powder: For Extra Lift and Consistency
While baking soda provides immediate lift, baking powder (which contains both an acid and a base) ensures the overall rise of the bread and helps with consistency. It doesn’t rely on acidic ingredients like bananas for activation, making it a great partner to baking soda.
Why Baking Powder Works:
- It provides additional lift for a fluffier texture.
- This leavening agent works in two phases—first when it comes into contact with moisture, and again when it’s heated during baking.
- A small amount helps to ensure a consistent rise throughout the loaf, especially in recipes that use a lot of wet ingredients (like banana bread).
3. The Right Amount of Baking Agents: Striking the Perfect Balance
Finding the right balance of baking soda and baking powder is essential for getting the perfect rise in your banana bread. Too much of either can cause issues:
- Too much baking soda can give the bread a bitter taste and may cause it to rise too quickly, resulting in cracks on the top or a dense interior.
- Too much baking powder can lead to a soapy or metallic taste and affect the bread’s texture.
Most banana bread recipes use a combination of baking soda for immediate lift (from the bananas’ acidity) and a small amount of baking powder to ensure a stable rise and fluffy crumb. The typical ratio is about 1 teaspoon of baking soda for every 2 cups of flour and 1 teaspoon of baking powder for added lift.
4. The Science Behind a Perfect Rise
Here’s how the chemistry of baking soda and baking powder works in your banana bread:
- Baking Soda Activation: When the baking soda combines with the acidic banana or even a dash of lemon juice or buttermilk, it starts to release carbon dioxide gas. The bubbles form tiny pockets of air that help the batter puff up and become light as it bakes.
- Baking Powder Boost: As the batter is heated, the baking powder releases additional carbon dioxide gas, providing a secondary rise, ensuring the bread doesn’t collapse after the initial rise. This makes your banana bread both light and moist.
- Texture Benefits: The combined effects of these leavening agents ensure that the bread has a soft, airy crumb without being too dense, and it stays moist even after baking.
5. Tips for Getting the Best Rise in Your Banana Bread
To ensure you achieve the perfect rise every time:
- Don’t Overmix: After adding the dry ingredients to the wet, mix gently. Overmixing develops the gluten too much, making the bread dense rather than light.
- Proper Oven Temperature: Make sure your oven is preheated to the correct temperature (usually 325°F to 350°F) before placing the batter inside. A hot oven allows the leavening agents to work immediately, giving your banana bread a good rise from the start.
- Don’t Open the Oven Door Early: Opening the door too soon can cause the bread to collapse. Avoid opening the oven for the first 25 minutes to let it bake without interruption.
Final Thoughts: All-Purpose Flour & Baking Agents Are Key to Success
The right combination of all-purpose flour, baking soda, and baking powder is essential to creating a fluffy, moist loaf of banana bread. By using these ingredients in the proper amounts, you’ll achieve a loaf that has the perfect texture, rise, and flavor every time—making it the ideal treat for breakfast, snacks, or dessert.
Eggs & Butter: The Building Blocks of Moist, Flavorful Banana Bread
When crafting the perfect banana bread, eggs and butter play a crucial role in delivering that rich taste and tender texture we all love. These two ingredients do more than just add flavor—they’re responsible for the structure, moisture, and softness that define a great loaf.
1. Eggs: More Than Just a Binder
Eggs bring balance to your banana bread by acting as both a structural and moisturizing agent.
- Structure & Stability: The proteins in eggs help the bread hold its shape while baking, keeping everything together as it rises.
- Moisture & Softness: Egg yolks add fat, which makes the crumb tender and prevents the bread from becoming too dry.
- Subtle Flavor: Eggs round out the overall taste, enhancing the natural sweetness of the bananas.
- Light Texture: Beaten eggs trap air in the batter, contributing to a soft, airy interior.
Tip: Let eggs come to room temperature before mixing for better integration into the batter.
2. Butter: The Secret to Flavor & Tenderness
Butter is a flavor powerhouse and key to getting that moist, bakery-style texture.
- Richer Flavor: It adds a creamy, comforting flavor that pairs perfectly with bananas.
- Tender Crumb: The fat coats the flour, limiting gluten formation and resulting in a softer loaf.
- Golden Crust: Butter helps your banana bread develop a beautiful, golden-brown exterior.
Butter vs. Oil: While oil works well for moisture, butter wins for flavor and that melt-in-your-mouth quality.
3. Creaming Method: How You Mix Matters
For an ultra-tender loaf, how you mix your butter and sugar is just as important as the ingredients themselves.
- Use room temperature butter—soft but not melted—for best results.
- Beat butter and sugar until the mixture looks pale and fluffy. This step helps trap air, giving your bread a better rise.
- Crack in the eggs one by one, blending well after each to ensure the batter stays silky and lump-free.
4. Dietary Swaps for Butter
If you’re baking for dietary preferences, there are a few great butter alternatives:
- Vegan Butter: Perfect for dairy-free versions while still providing richness.
- Coconut oil keeps the loaf moist while adding a subtle, tropical note that gives your banana bread a unique twist.
- Greek Yogurt or Applesauce: Lower-fat choices that still keep the bread soft, though with a slightly lighter flavor.
5. Finding the Right Balance
Too much butter can make your bread greasy, and too many eggs can make it dense. It’s all about balance. Most banana bread recipes work best with two to three eggs and a moderate amount of butter to keep things moist without being too heavy.erly, you can bake a loaf that’s the perfect balance of flavor and moisture.
Final Thought:
Eggs and butter are essential to making banana bread that’s soft, rich, and absolutely crave-worthy. Understanding their role gives you the power to tweak your recipe with confidence—whether you’re sticking with tradition or experimenting with healthier versions.
Vanilla Extract & Brown Sugar: For Depth of Flavor:
While bananas are the star of the show in any banana bread recipe, it’s the vanilla extract and brown sugar that add an extra layer of complexity and depth to the flavor profile. These two ingredients are simple, yet incredibly powerful, and their subtle contribution helps elevate your banana bread from basic to exceptional. Let’s dive into how these ingredients work together to enhance the taste and make your banana bread truly unforgettable.
1. The Magic of Vanilla Extract: A Subtle, Sweet Aroma
Vanilla extract is more than just a flavoring—it’s a flavor enhancer that works to deepen and balance out the other flavors in your banana bread. While bananas provide the primary sweetness, vanilla extract adds an earthy, aromatic undertone that pairs beautifully with the fruit.
The Importance of Vanilla Extract in Enhancing Banana Bread Flavor:
- Flavor Enhancer: Vanilla has the natural ability to enhance and round out other flavors in your baked goods. In banana bread, it works to highlight the sweetness of the bananas without overpowering them.
- Complexity and Warmth: The deep, warm flavor of vanilla adds a sense of complexity to your banana bread that makes it taste more rich and luxurious. It balances the sweetness from the bananas and brown sugar, making the loaf feel more harmonious overall.
- Aromatic Appeal: The aroma of vanilla wafting through your kitchen as the bread bakes is an irresistible part of the experience. It draws attention to the fresh flavors of the bread, creating an inviting atmosphere that makes your banana bread even more tempting.
Vanilla extract also works beautifully with the other spices, like cinnamon, nutmeg, or cardamom, that are often added to banana bread for a bit of spice. ChatGPT said:
Its adaptability makes it a perfect match for various flavors, enriching them with warmth and complexity.
Tip: Always use pure vanilla extract rather than artificial vanilla flavor. Pure vanilla extract has a much more complex and refined flavor that elevates the entire recipe.
2. Brown Sugar: Rich, Moist, and Flavorful
Brown sugar plays a key role in banana bread, not only by providing sweetness, but also by contributing moisture and depth of flavor. Unlike white granulated sugar, brown sugar contains molasses, which adds a unique, rich flavor profile that complements the bananas beautifully.
Why Brown Sugar Works So Well in Banana Bread:
- Molasses for Richness: The molasses in brown sugar gives banana bread a deeper, caramel-like flavor, which enhances the overall richness of the loaf. This richness pairs perfectly with the natural sweetness of the ripe bananas.
- Brown sugar’s moisture content helps maintain the softness and tenderness of your banana bread. This is especially important for banana bread, as it can sometimes turn out dry if the right balance of ingredients isn’t used. The molasses in brown sugar helps to lock in moisture, keeping your bread deliciously moist even after a few days.
- Richer Taste Profile: Brown sugar brings more depth than white sugar, offering warm notes of caramel, toffee, and a gentle hint of molasses that elevate the overall flavor of banana bread. This gives the banana bread a more nuanced taste, making it feel less one-dimensional and more multilayered.
Light brown sugar offers a milder flavor, while dark brown sugar adds a more robust molasses taste. Both are excellent choices for banana bread, with dark brown sugar enhancing the color and deepening the flavor.
3. The Perfect Balance: Vanilla & Brown Sugar Together
When combined, vanilla extract and brown sugar work in harmony to create a perfectly balanced flavor profile for your banana bread. The sweetness from the brown sugar is rounded out and elevated by the aromatic, warm undertones of the vanilla, creating a loaf that is rich, flavorful, and satisfying.
How They Complement Each Other:
- Sweetness with Depth: The rich sweetness of brown sugar adds a layer of complexity that goes beyond just sugary sweetness. Vanilla extract adds a touch of warmth and roundness that balances the bread’s flavor. Together, they prevent the bread from tasting overly sweet and create a more harmonious and sophisticated flavor.
- Layered Flavor Profile: The combination of sweet, warm vanilla and the caramel-like richness of brown sugar means your banana bread will have more layers of flavor to enjoy in every bite.
- Moisture & Texture: Brown sugar helps retain moisture, while vanilla enhances the flavor profile. The end result is a loaf that not only tastes great but has a soft, tender crumb that stays moist even after a few days.
4. Vanilla and Brown Sugar: Customization and Variations
If you want to get a bit creative with your banana bread and try different flavors, you can customize the amounts of vanilla extract and brown sugar to suit your taste preferences or dietary needs.
- Vanilla Variations: If you want to experiment with a more unique flavor, try vanilla bean paste or even bourbon vanilla extract for a richer, more complex flavor. The vanilla bean paste will add a few specks of vanilla that enhance the visual appeal as well.
- Sweetness Level: Adjust the amount of brown sugar depending on how sweet you like your banana bread. You can reduce the sugar by a little if you prefer a less sweet loaf, but keep in mind that brown sugar contributes to moisture, so a reduction may slightly affect the bread’s texture. Alternatively, you can try using coconut sugar for a more natural and lower glycemic index sweetener while still retaining a caramel-like flavor.
- Spiced Variations: Add a bit of cinnamon or nutmeg along with the vanilla and brown sugar for a warm, spiced version of banana bread. The spices will complement the vanilla’s warmth and bring out the natural flavor of the bananas.
5. The Impact on Your Banana Bread’s Final Flavor
When you use both vanilla extract and brown sugar, you’re ensuring that your banana bread isn’t just another quick bread, but a loaf full of complexity, richness, and flavor. The bananas, eggs, and flour create the foundation, but the vanilla and brown sugar bring it all together, making each bite more deliciously satisfying. They enrich the taste, elevating an ordinary recipe into something exceptional and unforgettable.
Conclusion: Enhancing Your Banana Bread with Vanilla and Brown Sugar
Incorporating vanilla extract and brown sugar into your banana bread recipe is an easy way to enhance the flavor, creating a loaf that’s not only sweet but has a rich, caramel-like depth that makes it stand out. Together, they bring out the best in the bananas and make your bread not just a snack, but a treat worth savoring with every bite.
Optional Add-ins: Walnuts, Chocolate Chips, or a Dash of Cinnamon
While banana bread is delightful on its own, incorporating mix-ins can elevate it to a whole new level, adding unique textures and bursts of flavor with every bite. Whether you’re in the mood for a crunchy, indulgent, or spiced treat, the right additions can transform your banana bread into a personalized masterpiece. Let’s take a look at some classic and creative mix-ins—walnuts, chocolate chips, and cinnamon—that will add an extra layer of flavor and texture to your loaf.
1.Walnuts: A Crunchy, Earthy Addition
Walnuts are a popular choice for banana bread, and for good reason. They offer a satisfying crunch that contrasts beautifully with the soft, moist crumb of the bread. Their rich, slightly nutty flavor balances the sweetness of the bananas and brown sugar, enhancing the overall taste of the bread.
Why Walnuts Enhance Banana Bread:
Crunchy Texture: The walnuts add a delightful crunch, providing contrast against the bread’s soft, tender texture. This extra texture can make your loaf feel more interesting and satisfying.
Rich Flavor: Walnuts’ slightly bitter taste pairs wonderfully with the natural sweetness of the bananas and brown sugar, contributing a balanced and complex flavor.
Health Benefits: Walnuts are an excellent source of omega-3 fatty acids, fiber, and antioxidants, making them a nutritious addition to your banana bread.
Tip: Toast the walnuts lightly before incorporating them into the batter for a deeper flavor and enhanced aroma.
2.Chocolate Chips: Sweet Indulgence
For those who love chocolate, adding chocolate chips to banana bread is a no-brainer. The gooey, melted chocolate combined with the ripe bananas creates a decadent treat that’s almost like dessert. Whether you opt for semi-sweet, milk, or dark chocolate, you can adjust the sweetness to your liking.
Why Chocolate Chips Are Perfect for Banana Bread:
Decadent Flavor: Chocolate chips bring a rich, sweet flavor that pairs beautifully with bananas, resulting in a treat that feels indulgent.
Melted Chocolate: As the banana bread bakes, the chocolate chips melt, creating pockets of gooey chocolate that make each bite even more enjoyable.
Customizable Sweetness: Choose from different types of chocolate to control the sweetness of the bread. Semi-sweet chips offer a balanced taste, dark chocolate gives a more intense flavor, and milk chocolate adds extra sweetness.
Tip: Add chocolate chips last to the batter to avoid overmixing and ensure they stay intact, melting beautifully in the finished loaf.
3.Cinnamon: Warm Spice for Added Depth
A sprinkle of cinnamon can do wonders for banana bread, adding a warmth and depth to the flavor that complements the natural sweetness of the bananas. It also pairs well with other add-ins like chocolate and nuts, creating a harmonious blend of flavors.
Why Cinnamon is a Great Addition:
Warm, Cozy Flavor: Cinnamon adds a comforting, spicy note that brings out the best in the bananas and brown sugar, evoking the feel of fall or holiday baking.
Balanced Sweetness: The natural sweetness of cinnamon enhances the flavor of the bananas, making the bread taste even sweeter without being overly sugary.
Versatile Pairing: Cinnamon works beautifully with a variety of other add-ins, whether you’re using chocolate chips, walnuts, or both, giving the bread a well-rounded flavor.
Tip: For a subtle spiced flavor, add 1-2 teaspoons of ground cinnamon to the dry ingredients, or swirl extra cinnamon into the batter for a more pronounced taste.
4.Other Creative Add-ins
If you’re looking to experiment further, here are some other fun and delicious mix-ins to consider for your banana bread:
Chopped Pecans or Almonds: If you prefer a different nut, pecans or almonds offer a similar crunchy texture to walnuts, but with their own distinct flavor.
Shredded Coconut: Add unsweetened shredded coconut for a tropical twist. It gives the bread a slightly sweet flavor and texture that pairs well with bananas.
Dried Fruit (Raisins or Cranberries): Dried fruit adds bursts of chewy sweetness that contrast nicely with the soft crumb of the bread.
Oats: Rolled oats can add chewiness and a hearty flavor to your loaf, along with extra fiber.
Nutmeg or Cardamom: Add a pinch of nutmeg or cardamom for a more exotic spice combination that complements the bananas’ flavor beautifully.
Tip: When adding multiple mix-ins, stick to a total of 1/2 to 1 cup of optional ingredients to avoid altering the loaf’s texture too much.
5.Tips for Evenly Distributing Mix-ins
To ensure that your add-ins are evenly spread throughout the batter and don’t sink to the bottom, follow these simple steps:
Toss in Flour: Coat your mix-ins (nuts, chocolate chips, dried fruit, etc.) with a small amount of flour before adding them to the batter. This helps keep them evenly distributed throughout the batter during baking.
Fold Gently: Mix the add-ins in carefully to avoid overmixing, which could make the bread dense or tough. Take care not to crush delicate ingredients like chocolate chips.
Even Distribution: Make sure the add-ins are evenly incorporated throughout the batter for a balanced flavor in every bite.
Final Thoughts: Customize Your Banana Bread
Adding optional mix-ins like walnuts, chocolate chips, or cinnamon is a great way to personalize your banana bread and make it uniquely yours. Whether you prefer the crunchy texture of walnuts, the richness of chocolate, or the warmth of cinnamon, these additions will help you experiment and create a loaf that suits your taste. The beauty of banana bread is its versatility, and these optional add-ins provide endless possibilities for making a loaf that’s truly one of a kind.
Step-by-Step Instructions for Foolproof Banana Bread.
Step 1: Prep Your Ingredients & Equipment (Preheat Oven, Mash Bananas, Prepare Loaf Pan)
The first step in making a perfect banana bread starts well before you even mix your ingredients—it’s all about preparation. Preparing your ingredients and equipment in advance ensures that the process goes smoothly, and you don’t miss any important steps. This crucial initial phase sets you up for a flawless bake. Let’s dive into the key components of this first step to guarantee that your banana bread comes out moist, fluffy, and delicious.
1. Preheat the Oven: Ensuring Even Baking
Before you start mixing anything, it’s important to preheat your oven. This ensures that your banana bread bakes evenly from the start and avoids any potential temperature inconsistencies that could affect the texture and rise of the bread. A hot oven guarantees that the batter will rise properly and the edges of the bread will bake evenly.
Why Preheating is Essential:
- Even Heat Distribution: By preheating the oven to the recommended temperature (usually around 350°F or 175°C), you ensure that your bread will cook evenly, helping it to rise and set at the right speed.
- Perfect Rise: Starting with a properly heated oven encourages the baking soda or baking powder to activate immediately, creating that beautiful rise in your loaf. This also helps the bread set and firm up the way it should.
- Saves Time: When the oven is already at the correct temperature when you put the bread in, you avoid a situation where the bread sits in a cold oven, which could affect how it bakes and its overall texture.
Tip: Always check that your oven is calibrated properly. If you’re unsure, use an oven thermometer to verify its accuracy.
2. Mash the Bananas: The Key to Moisture and Flavor
The bananas are the star ingredient in any banana bread recipe, and how you prepare them can have a major impact on the bread’s texture. You want to mash your bananas thoroughly so they integrate well into the batter, creating a smooth texture and infusing the bread with sweetness and moisture.
Why Ripe Bananas are Important:
- Natural Sweetness: Overripe bananas (those with plenty of brown spots) have the most intense sweetness, which is perfect for banana bread. These bananas will contribute the natural sugar that makes the bread moist and flavorful without needing to rely too heavily on extra sugar.
- Moisture Content: The mashing process helps release the moisture in the bananas, which is key for creating that soft, tender crumb. This moisture helps balance the other ingredients, making the bread less likely to dry out.
- Even Consistency: Mashing the bananas ensures they’re evenly distributed throughout the batter, helping to create a uniform texture. You don’t want chunks of banana in some bites and none in others, so aim for a smooth but slightly textured mash.
Tip: Tip: Choose bananas with lots of brown spots—they’re sweeter and mash more easily, giving your bread the best taste and moisture.If your bananas aren’t ripe enough, try placing them Place them in a paper bag for a day or two to encourage quicker ripening.
3. Prepare Your Loaf Pan: Prevent Sticking and Ensure Easy Removal
Before you begin mixing your banana bread batter, it’s essential to prepare your loaf pan. This step ensures that your bread doesn’t stick to the pan and comes out with a nice, even shape.
How to Prepare Your Loaf Pan Properly:
- Coat the Loaf Pan: Lightly brush the inside of your pan with melted butter or oil to keep the banana bread from sticking. Make sure to coat the sides and bottom thoroughly so that the bread can easily slide out once it’s baked.
- Flour the Pan: After greasing, lightly dust the pan with flour to further ensure the loaf won’t stick. This creates a non-stick surface that helps the bread maintain its structure as it bakes.
- Parchment Paper (Optional): For extra insurance, you can line the bottom of the pan with a piece of parchment paper, leaving a little overhang so you can lift the bread so it releases smoothly from the pan after baking. This method is especially helpful if you’re concerned about sticking or if you’re baking a sticky batter.
Why Proper Pan Preparation Is Important:
- Even Cooking: Greasing and flouring the pan ensures that the bread bakes evenly, without any parts sticking to the sides and affecting the overall texture.
- Easy Removal: By preparing the pan properly, you make it easy to remove the bread from the pan once it’s finished baking. This prevents the bread from breaking or sticking to the sides, keeping your loaf intact and perfectly shaped.
Tip: If you’re using a non-stick pan, you may still need to grease and flour it for the best results. Always follow the manufacturer’s instructions, especially with specialized pans.
4. Gather All Ingredients: Have Everything Ready
This step might seem simple, but having all of your ingredients measured and ready to go before you start mixing ensures a smoother process. This is especially important for banana bread, where the order and method of combining ingredients can impact the final texture.
Why Prepping Ingredients is Important:
- Saves Time: Once you start mixing, you want to move quickly to avoid overmixing the batter, which can make the bread dense. Having everything prepared and within reach means you don’t have to stop and search for ingredients mid-bake.
- Accurate Measurements: Precise measurements ensure the bread has the right balance of moisture, sweetness, and leavening, so the loaf rises and bakes as expected.
- Organized Workflow: Having everything out and ready prevents mistakes and gives you confidence that you won’t forget any key ingredient, like baking soda or salt.
5. Prep Additional Add-ins (Optional): Customize Your Bread
If you’re planning on adding any optional mix-ins like walnuts, chocolate chips, or cinnamon, now is the time to get them ready. Measure out any additional ingredients and toss them in a bit of flour to ensure they don’t sink to the bottom of the loaf during baking.
Why You Should Prep Add-ins Early:
- Even Distribution: By prepping your mix-ins in advance and coating them lightly in flour, you ensure they’ll be evenly distributed throughout the batter, rather than clumping together or sinking to the bottom.
- Customization: If you’re using nuts or chocolate chips, this is also your time to customize the flavor. Adding extra cinnamon or other spices can help you personalize the banana bread to your liking.
Final Thoughts on Step 1: Preparation is Key!
Getting all your ingredients and equipment ready before you begin mixing is a small but crucial step in the banana bread-making process. It ensures a smooth workflow, gives you time to focus on each stage, and ultimately helps you bake a loaf that’s moist, fluffy, and perfectly baked. Taking the time to prep properly guarantees that your banana bread will turn out just the way you want—every time.
Step 2: Mix the Wet & Dry Ingredients Separately (Combine Wet Ingredients First, Then Mix with Dry):
Step 2 is where the magic begins! Now that your oven is preheated, your bananas are mashed, and your loaf pan is ready, it’s time to start combining the ingredients. This step is crucial because mixing the wet and dry ingredients separately ensures that your banana bread comes out light, fluffy, and perfectly risen. By properly handling the ingredients at this stage, you set up a smooth and even batter, which translates to a delicious loaf when baked. Let’s break down this process step-by-step.
1. Why Mix Wet and Dry Ingredients Separately?
Mixing the wet and dry ingredients in two separate bowls is an essential part of the baking process, as it helps to maintain the correct texture and consistency of the banana bread. When you combine the wet ingredients first and then add the dry ingredients, you ensure that everything is evenly incorporated without overmixing the batter.
Benefits of Mixing Wet & Dry Ingredients Separately:
- Prevents Overmixing: Overmixing banana bread batter can result in a dense or tough loaf because it activates the gluten in the flour too much. By mixing the wet and dry ingredients separately, you can combine them gently, ensuring you don’t overmix and avoid developing too much gluten.
- Even Distribution: When dry ingredients like flour, baking soda, and salt are mixed separately, they are evenly distributed before being added to the wet ingredients. This leads to an even rise and texture throughout the bread.
- Better Texture: Mixing wet and dry separately allows for a smoother batter, ensuring there are no lumps or flour streaks in the final bread. This is especially important for creating a soft crumb.
2. Mixing the Wet Ingredients: Starting with the Essentials
Start by combining all the wet ingredients in a separate bowl. The wet ingredients typically include your mashed bananas, eggs, butter (or oil), vanilla extract, and brown sugar. The purpose of mixing these ingredients first is to ensure they’re evenly distributed before adding them to the dry ingredients.
Why Mixing Wet Ingredients First is Important:
- Bananas & Moisture: The mashed bananas are the key to creating a moist, flavorful loaf. Mixing them with the eggs and melted butter first allows the moisture from the bananas to be evenly distributed throughout the batter.
- Even Sweetness: By mixing the brown sugar and wet ingredients together, you ensure that the sweetness is uniformly incorporated into the batter. This results in a balanced flavor throughout the bread.
- Emulsification: The eggs and butter help to create an emulsion, which keeps the batter from separating when combined with the dry ingredients. This ensures a smooth, cohesive batter.
How to Mix Wet Ingredients:
- Mash Bananas: In a large mixing bowl, start with your mashed ripe bananas. Use a fork or potato masher to break them down until smooth with just a bit of texture remaining.
- Incorporate the eggs individually, blending each one thoroughly into the mashed bananas before adding the next. The eggs will help bind the mixture together and add richness to the bread.
- Incorporate Butter and Sugar: Next, add the melted butter and brown sugar to the mix. Whisk until the mixture is smooth and the sugar has dissolved into the wet ingredients.
- Stir in a bit of vanilla extract at the end to deepen the flavor and add a cozy, fragrant touch to your banana bread.
3. Mixing the Dry Ingredients: Building Structure and Leavening
In another mixing bowl, whisk together your dry ingredients—typically flour, baking soda, and a pinch of salt—to ensure they’re evenly blended before combining with the wet mixture. Mixing the dry ingredients separately ensures that the leavening agents (like baking soda) and salt are evenly distributed throughout the flour before they are incorporated into the wet ingredients.
Why Mixing Dry Ingredients Separately Matters:
- Even Distribution of Leavening Agents: Baking soda is the leavening agent that will help the banana bread rise, creating a light and fluffy texture. If baking soda or salt is not evenly distributed in the dry mixture, certain areas of the batter may rise too much, while others remain dense.
- Prevents Clumps: By whisking the dry ingredients together, you prevent clumps of flour or baking soda from forming in the batter, which could lead to uneven texture or pockets of powder in your loaf.
- Structure for the Bread: Flour provides the structure needed for your banana bread, while the baking soda helps it rise. Mixing these elements together ensures they work effectively to create the perfect texture.
How to Mix Dry Ingredients:
- Combine Flour & Baking Soda: Start by whisking the flour and baking soda together in a medium-sized bowl. Ensure the baking soda is thoroughly mixed with the flour so the bread rises evenly during baking.
- Add Salt: Sprinkle in the salt, and give the mixture another quick whisk. Salt balances the sweetness of the bread and enhances the flavor, so it’s important that it’s evenly distributed.
4. Bringing the Wet and Dry Ingredients Together (The Folding Process)
Once the wet and dry ingredients are mixed separately, it’s time to combine them. This step requires a gentle folding motion, as overmixing can result in a tough, dense loaf.
Why Folding is the Right Technique:
- Even Distribution Without Overmixing: Folding involves gently incorporating the wet ingredients into the dry without stirring too vigorously. This helps to avoid overworking the gluten in the flour, which could make the bread dense and chewy rather than light and fluffy.
- Maintains Air in the Batter: The gentle folding motion helps preserve the air bubbles in the batter, ensuring the bread rises properly and has a soft, airy texture.
- No Overworked Batter: By folding, you’re able to mix the ingredients just enough to create a smooth batter without going too far, which can cause the bread to be tough and heavy.
How to Fold Wet and Dry Ingredients Together:
- Add Dry to Wet: Pour the dry ingredients into the bowl with the wet ingredients.
- Fold Gently: Using a spatula or wooden spoon, fold the dry ingredients into the wet mixture in a circular motion. Continue folding until the dry ingredients are just incorporated. Be careful not to overmix or stir too aggressively.
- Check for Lumps: If there are any small lumps of flour, it’s okay! Just make sure the batter is fully combined without overworking it.
5. Final Steps: Ready for the Oven!
Once your wet and dry ingredients are thoroughly mixed together, you’ll have a smooth and lumpy batter that’s ready to go into the prepared loaf pan. At this stage, you can also add any optional mix-ins, like chocolate chips, walnuts, or cinnamon, and fold them in gently.
Tip: If the batter seems too dense, add a tablespoon of milk or water to thin it out a bit. The batter should be thick but spoonable, with a smooth texture that’s not too runny.
Final Thoughts on Step 2: Mixing Wet and Dry Ingredients
Properly mixing your wet and dry ingredients separately is key to creating a banana bread with the right texture and flavor. By mixing them in this order, you ensure that the batter comes together smoothly without overmixing, which could result in a dense loaf. Take your time with this step, and remember—gentle folding is the key to achieving a perfect, fluffy banana bread that’s moist and tender every time.
Step 3: Bake to Perfection (Ideal Temperature and Baking Time for a Golden Crust and Moist Center):
Step 3 is where everything you’ve prepared comes together to create that golden, perfectly baked loaf of banana bread. This step is just as critical as the previous ones because the right baking temperature and timing are crucial to achieving the perfect texture: a golden, crisp crust and a soft, moist center. Let’s explore how to bake your banana bread to perfection and avoid common pitfalls that can affect the final result.
1. The Right Baking Temperature: Consistent Heat is Key
Baking banana bread at the correct temperature ensures that your bread cooks evenly and develops the perfect texture. Too high, and you risk a burnt crust; too low, and the loaf may not rise properly or cook through.
Ideal Temperature for Baking Banana Bread:
- 350°F (175°C): This is the most common and ideal temperature for banana bread. Baking at this temperature allows the bread to rise evenly while developing that golden, slightly crisp crust. It also ensures that the interior of the bread cooks through, staying moist without becoming dry.
- Why 350°F Works Well: At this moderate temperature, the bread has time to cook through without burning, giving the bananas and other ingredients time to blend together for a perfect texture. Baking at higher temperatures can cause the outside to cook too quickly, leaving the inside raw, while lower temperatures may not allow the bread to rise as nicely.
Why Consistent Temperature Matters:
- Even Cooking: An oven that is too hot can cause the outside to cook too quickly, potentially leading to a dark, over-browned crust and an undercooked center. Conversely, baking at a temperature that is too low can cause the bread to have a dense crumb because the baking agents (such as baking soda) don’t activate at the proper time.
- Steady Heat: It’s important to let your oven preheat to 350°F before placing the banana bread in. This helps maintain consistent heat, ensuring an even rise and a balanced bake.
Tip: If you have an oven thermometer, it’s always a good idea to use it to ensure your oven’s temperature is accurate, as many ovens tend to run hotter or cooler than the temperature settings indicate.
2. Baking Time: The Sweet Spot for a Perfect Rise
Baking banana bread takes some patience. The ideal baking time depends on the size and depth of your loaf pan and how much batter you’re working with. Banana bread usually needs about 60 to 70 minutes in the oven to bake through completely.
Why Baking Time Varies:
- Pan Size: If you’re using a larger, wider loaf pan, your banana bread will bake faster because the batter is spread out in a thinner layer. In contrast, a deeper loaf pan will take longer to bake as the heat takes more time to reach the center of the bread.
- Oven Differences: Every oven is a little different, so the baking time can vary depending on your oven’s heat distribution and whether it has hot spots. This is why you should always check for doneness before relying solely on the time listed in the recipe.
How to Know When It’s Done:
- Golden-Brown Crust: The bread should have a rich golden-brown crust that looks firm and slightly crisp. This color indicates that the bread has baked through without becoming overdone.
- ChatGPT said:
- To check for doneness, stick a toothpick into the center of the loaf—if it comes out clean or with just a few moist crumbs, your banana bread is ready to come out of the oven. If the toothpick comes out with wet batter, continue baking for an additional 5-10 minutes and check again.
- Touch Test: You can gently press on the top of the bread. If it springs back and doesn’t leave an indentation, it’s likely done. If the top feels soft or sinks when touched, it might need more time in the oven.
Tip: If the top starts to brown too fast while the inside is still undercooked, tent the loaf with foil to prevent over-browning while it finishes baking. This will protect the top from burning while allowing the bread to finish cooking in the center.
3. Use a Loaf Pan that’s the Right Size and Material
The type of loaf pan you use can have a significant impact on the final outcome of your banana bread.
Pan Material:
- Metal Pans: These conduct heat very well and typically produce a crisper crust. But keep in mind—they tend to bake more quickly, so it’s important to monitor them closely to avoid overbaking.
- Glass or Ceramic Pans: These pans are a bit slower to heat up and may result in a slightly softer crust. If using a glass or ceramic pan, you might need to bake for a bit longer to get the same results as with a metal pan.
Pan Size:
- 9×5-inch loaf pan: This is the most common size for banana bread and works well with most recipes. It allows the batter to bake evenly, creating the perfect loaf shape.
- 8×4-inch loaf pan: This smaller pan can make the batter a bit thicker, so you may need to increase the baking time to ensure the bread cooks through properly.
Tip: If you use a different pan size than what the recipe suggests, be sure to adjust the baking time. For instance, a larger pan will cook the batter faster, while a smaller pan may require extra time.
4. Monitor the Bread’s Progress: Patience is Key
While the banana bread is baking, avoid the temptation to open the oven door too often. This can cause the temperature to fluctuate, affecting how the bread rises and bakes. Let the bread bake undisturbed until it’s nearly done, and then check for doneness.
Why Patience is Important:
- Even Rise: Opening the oven door prematurely can disrupt the rise of the bread, causing it to collapse or bake unevenly.
- Moisture: Banana bread requires time to set, so avoid cutting into it too soon after baking. Letting it cool slightly ensures that the moisture inside has a chance to redistribute, preventing a soggy center or overly dense texture.
Tip: Set a timer to remind yourself to check the bread at the one-hour mark. If it’s still not done, check every 5 minutes or so until it passes the toothpick test.
5. Cooling Down: Let It Rest Before Slicing
Once your banana bread is baked to perfection, you might be eager to dig in, but cooling it down is an essential step that helps lock in moisture and ensures a better texture.
Why Letting the Bread Cool is Important:
- Stabilizes Texture: As the bread cools, the moisture from the bananas and other ingredients redistributes throughout the loaf, ensuring a moist and tender crumb. Cutting into the bread too soon can result in a gummy or underbaked texture.
- Easy Removal: Letting the bread rest for about 10-15 minutes in the pan makes it easier to remove from the loaf pan without breaking.
- Flavor Development: Allowing the bread to cool helps the flavors meld and settle, making it even more delicious when you finally slice into it.
Tip: If you’re in a rush, you can transfer the bread to a cooling rack after it’s rested in the pan. This helps promote even cooling by letting air flow freely around the entire loaf.
Final Thoughts on Step 3: Perfectly Baked Banana Bread
Baking banana bread to perfection requires attention to detail, from choosing the right temperature to managing the baking time. By setting the oven to the correct temperature, using the right pan, and checking for doneness at key points, you’ll end up with a loaf that has a golden crust, a fluffy, moist center, and a rich flavor. And remember, patience during the baking process and after baking for cooling is just as important for achieving the perfect texture and flavor. Follow these steps carefully, and you’ll be rewarded with a banana bread that is truly baked to perfection.
Step 4: Cool & Serve (Let It Rest for the Best Texture and Flavor):
The final step of the banana bread process—cooling—is just as essential as all the previous steps. Though you may be eager to dive in, letting your banana bread rest for the right amount of time is crucial for ensuring the best texture, flavor, and overall enjoyment. Cooling allows the bread to set and finish developing its full, delicious flavor profile. This step helps you avoid any potential issues that could arise from cutting into the bread too early.
Let’s break down the importance of cooling and serving your banana bread:
1. Why Cooling Is Important: Set the Structure and Texture
When your banana bread comes out of the oven, it’s still very hot and a bit soft. If you cut into it immediately, the structure is still fragile, and the heat hasn’t fully distributed throughout the loaf. By allowing the bread to cool for the right amount of time, you give the moisture and flavors a chance to fully settle, resulting in a much better eating experience.
How Cooling Affects Texture:
- Moisture Distribution: As the banana bread cools, the steam inside the bread starts to redistribute, helping to prevent any areas from becoming too dry or too wet. This helps achieve that perfect balance of a moist, tender crumb.
- Firmness and Sliceability: If you slice into the bread while it’s still hot, it might fall apart or become mushy. By letting it cool, the loaf firms up, making it easier to slice without it falling apart. The bread will also hold its shape better, ensuring a clean, smooth cut.
- Prevent Soggy Crumbs: Allowing the bread to cool properly prevents the interior from becoming too dense or soggy, which can happen if you cut too soon while the bread is still too hot and releasing steam.
Tip: Allow your banana bread to rest in the pan for at least 10-15 minutes before attempting to remove it. This helps it cool slightly and firm up without risking any breakage or deformation when you take it out of the pan.
2. Cooling Time: Don’t Rush the Process
It can be tempting to slice into the warm loaf right out of the oven, but giving the bread enough time to cool is the key to achieving the right texture and flavor. The cooling process also helps the bread to reach room temperature, making it much more pleasant to enjoy.
How Long Should You Let Banana Bread Cool?
- Initial Cooling in the Pan: After you remove your banana bread from the oven, let it cool in the pan for about 10-15 minutes. This rest period ensures the bread doesn’t break when you take it out of the pan and helps it set just enough to maintain its shape.
- Cooling Completely: Once the bread has rested in the pan, transfer it to a cooling rack. Let it cool for at least 30-45 minutes before cutting into it. If you have the time, it’s even better to let the bread cool for an hour or two. This allows the flavors to fully develop and the texture to firm up for perfect slicing.
Tip: If you’re in a hurry, you can speed up the cooling process by loosely covering the bread with a clean kitchen towel. This helps retain a little moisture while still allowing air to circulate around the bread.
3. Flavor Development: Better After It Cools
Believe it or not, banana bread tastes better after it has cooled! The cooling process gives the flavors time to mature and meld together. When the bread is hot, the heat can mask some of the more subtle flavors, and the texture may not be fully developed.
Why Cooling Enhances Flavor:
- Flavor Deepening: Cooling allows the bananas and other ingredients like vanilla, brown sugar, and cinnamon to marry together, creating a more complex flavor profile. When you eat banana bread too soon, it may taste greasy or overly sweet, but cooling helps balance those flavors.
- Sweetness Stabilization: As the bread cools, the natural sugars from the bananas and brown sugar become more evenly distributed, giving you an evenly sweet loaf. If you cut it too early, the sweetness may be uneven, and the bread may not have reached its full potential.
- More Enjoyable Flavor: Once cooled, the bread becomes more aromatic and easier to savor. The subtle banana flavor really shines through, and the spices, like cinnamon or nutmeg, have time to develop and fill your mouth with a comforting warmth.
Tip: If you’re storing the bread to eat later, be sure to wrap it tightly to lock in that moisture and flavor so it doesn’t dry out.
4. Cooling in the Pan vs. Cooling on a Rack: What’s the Best Method?
The method you choose for cooling can impact the final texture of your banana bread.
Cooling in the Pan:
- Cooling the bread in the pan for the first 10-15 minutes helps the loaf hold its shape and gives you time to safely remove it from the pan without breaking it apart.
- However, leaving the bread in the pan for too long can cause the bottom to become soggy because it retains too much moisture, so make sure to transfer it to a cooling rack shortly after it’s cool enough to handle.
Cooling on a Rack:
- After the initial cooling period, it’s best to remove the bread from the pan and transfer it to a cooling rack. This allows air to circulate around the entire loaf, helping it cool evenly and preventing the bottom from becoming too damp or soggy.
- A cooling rack also prevents the bread from sitting in its own steam, which could cause the crust to soften and become chewy.
Tip: If you don’t have a cooling rack, you can create your own makeshift rack by placing the loaf on a flat surface, like the back of a baking sheet, to allow air to flow beneath the bread.
5. Serve & Enjoy: The Moment You’ve Been Waiting For
Once your banana bread has cooled, it’s time to slice, serve, and enjoy the fruits of your labor. But the wait has been worth it for a reason: The bread is now at its peak in terms of flavor and texture.
How to Serve Banana Bread:
- Perfect for Breakfast or Snacks: Slice the bread thick or thin, and serve it as a delightful breakfast or mid-morning snack. It pairs wonderfully with a cup of coffee or tea.
- Top it Off: Serve your banana bread with a spread of butter, cream cheese, or even a drizzle of honey for an extra indulgent treat.
- Great for Dessert: Banana bread can easily double as a dessert, especially when served with a scoop of vanilla ice cream or a dollop of whipped cream. For an extra special touch, sprinkle some chocolate chips or toasted walnuts on top.
How to Store Leftover Banana Bread:
- Room Temperature: If you’re planning to eat the bread within a few days, keep it on the countertop in a sealed container or wrapped in foil or plastic wrap to retain moisture.
- Freezing for Later: For longer storage, banana bread freezes very well. Wrap it tightly in plastic wrap or foil and place it in a freezer-safe bag. To thaw, let it sit at room temperature for a few hours or heat individual slices in the microwave or toaster.
Final Thoughts on Step 4: Cooling & Serving
Cooling your banana bread properly is key to locking in the moisture, flavor, and perfect texture that you’ve worked so hard to achieve. By allowing the bread to cool in the pan briefly and then transferring it to a rack, you ensure that it holds its shape and doesn’t become soggy. This simple but essential step helps develop the flavors and makes it easier to slice and serve. So take a moment to savor the process and enjoy the fruits of your labor with a perfectly cooled, delicious slice of homemade banana bread.
Expert Tips for the Best Banana Bread.
Use Overripe Bananas: Dark, Spotty Bananas Make the Bread Extra Moist and Sweet
The secret to creating the most moist and flavorful banana bread lies in the type of bananas you use. While fresh bananas are perfect for eating as a snack or in smoothies, overripe bananas—those with dark spots and soft flesh—are the key ingredient for banana bread that’s packed with natural sweetness, moisture, and flavor.
Let’s dive into why overripe bananas are a game-changer and how they contribute to the perfect loaf of banana bread.
1. Enhanced Sweetness: Natural Sugars in Overripe Bananas
As bananas ripen, the starches in the fruit break down into sugars, making overripe bananas sweeter than their firmer, yellow counterparts. These sugars provide a natural sweetness to your banana bread, reducing the need for additional sugar and allowing the true flavor of the bananas to shine.
Why Overripe Bananas Are Sweeter:
- Starch Conversion: As bananas ripen, their starches convert into glucose, fructose, and sucrose, the natural sugars that give the fruit its sweetness. This is why overripe bananas taste much sweeter than ripe or underripe ones.
- Sugar Content: When you use overripe bananas, you’re using fruit that has reached its peak sweetness, meaning your banana bread will have a richer flavor profile. These natural sugars will also balance well with the vanilla extract, brown sugar, or any additional spices like cinnamon.
Tip: If you’re looking to reduce the added sugar in your recipe, using overripe bananas will allow you to cut back on the amount of sugar you use without sacrificing the sweetness of the bread.
2. Extra Moisture: Overripe Bananas Add the Perfect Texture
The riper the banana, the more moisture it contains. Overripe bananas are typically very soft and even slightly mushy, which means they incorporate well into the banana bread batter, contributing to a soft, moist crumb.
Why Overripe Bananas Keep Your Bread Moist:
- Natural Moisture: Overripe bananas contain more water due to their soft and mushy texture. This extra moisture is essential for ensuring your banana bread turns out tender and not dry or dense.
- Better Absorption: The mushy texture of overripe bananas blends seamlessly into the batter, ensuring that moisture is evenly distributed throughout the bread. This results in a smooth, soft texture and a moist center that will stay fresh longer than banana bread made with less ripe bananas.
Tip: For even more moisture, you can mash the bananas well so that they blend easily into the batter. This will ensure the bread stays moist and doesn’t dry out during baking.
3. Deeper Flavor Profile: Complexity from Overripe Bananas
Beyond the sweetness, overripe bananas bring a richer, deeper flavor to banana bread. The ripening process enhances the banana’s natural flavor, making it more pronounced and complex.
Why Overripe Bananas Have More Flavor:
- Fermentation Process: As bananas ripen, they undergo a slow fermentation process, which enhances the depth of their flavor. This results in a more caramel-like taste that’s perfect for banana bread.
- Intensified Aroma: Overripe bananas have a stronger, more fragrant aroma that carries over into the finished bread. The smell of baking banana bread made with overripe bananas is irresistible and mouthwatering, drawing you in before you even take a bite.
Tip: Don’t be afraid of those dark spots or even slight mushiness. They’re the key to deepening the flavor of your banana bread and giving it that irresistible, homemade taste.
4. Easy to Mash: Overripe Bananas Blend Into the Batter Effortlessly
Mashing overripe bananas is a breeze. Since they are naturally soft and mushy, they require minimal effort to break down into the smooth consistency needed for banana bread. This ease of mashing not only saves time but also ensures that the bananas are perfectly incorporated into the batter.
Why Mashing Overripe Bananas Is So Easy:
- Super Soft Flesh: The softer, squishier texture of overripe bananas means you don’t have to spend much time mashing them. A simple fork or potato masher will do the trick.
- Even Consistency: Since the bananas are already close to a liquid state, they will blend into the batter smoothly, ensuring a uniform distribution of banana flavor throughout the bread.
Tip: If your bananas are extremely overripe and almost liquid, be cautious about adding too much at once. You may need to adjust the flour slightly to maintain the right consistency.
5. Prevent Waste: Use Bananas That Would Otherwise Go to Waste
Instead of throwing away bananas that are too ripe to eat, consider using them in your banana bread recipe. It’s a great way to reduce food waste while making something delicious.
The Eco-Friendly Benefit of Using Overripe Bananas:
- Repurpose Overripe Bananas: Many people discard bananas when they’re too ripe, but these bananas are perfect for baking! By using overripe bananas, you not only make great use of bananas that might otherwise go to waste, but you also help reduce your food waste footprint.
- Sustainability: By embracing overripe bananas in your baking, you’re making a more sustainable choice, cutting down on the amount of food that ends up in landfills.
Tip: If you have a bunch of bananas ripening at the same time, freeze them for later use. Peel and store them in a freezer bag, and pull them out whenever you’re ready to make banana bread.
6. The Perfect Ripe Banana: How to Choose the Right One
Not all bananas will work equally well in your banana bread, so here are a few tips on how to choose the perfect ripe banana:
Signs You’ve Got the Right Banana:
- Dark Spots: The more dark spots or browning, the better the banana is for banana bread. This shows that the sugars have fully developed.
- Softness: Gently squeeze the banana—if it gives slightly but doesn’t feel mushy or overly squishy, it’s at the perfect stage.
- No Green: Green bananas are not ripe enough for banana bread. Wait until the bananas have turned fully yellow with some brown spots for optimal results.
Tip: The more overripe the bananas are, the sweeter and moister your bread will be. So, don’t worry if they’re almost black—they’ll still be perfect for baking.
Final Thoughts on Overripe Bananas
In conclusion, overripe bananas are your best friend when it comes to making banana bread. They bring the perfect balance of natural sweetness, moisture, and flavor that will elevate your banana bread to the next level. The next time you have bananas sitting on your counter that are starting to go soft and spotty, don’t throw them away—use them to create the best banana bread you’ve ever made! Plus, using overripe bananas ensures you’re baking with more sustainable ingredients and reducing food waste in the process.
Avoid Overmixing the Batter: Keeps the Bread Light and Fluffy
When making banana bread, the way you mix the batter plays a significant role in determining the final texture of the bread. Overmixing the batter can lead to a dense, heavy, and chewy loaf—the exact opposite of what you want when striving for a light and fluffy banana bread. Understanding how to mix the ingredients just right is crucial to achieving that perfect loaf.
Let’s break down why overmixing can be a problem and how to avoid it to ensure a lighter, airier texture in your banana bread.
1. The Science Behind Overmixing: Too Much Gluten Development
The key to understanding the effects of overmixing lies in the role of gluten in the batter. Gluten is a protein found in wheat flour that, when mixed with liquid, forms a network of strands. This network is what gives baked goods their structure and chewiness. However, if you mix the batter too much, you end up developing too much gluten, resulting in a tougher, denser loaf.
How Overmixing Affects the Bread:
- Increased Gluten Formation: When you mix the flour into the wet ingredients too much, you activate the gluten, and the batter becomes stretchy and elastic. This leads to a tough, dense texture in the final loaf.
- Tight, Chewy Crumbs: Overmixing causes the banana bread to lose its lightness, and the crumbs will become tight and rubbery, rather than airy and soft.
Tip: Aim to mix your batter only until the ingredients are just combined. It’s okay if there are a few lumps! These will disappear during baking, and you’ll have a loaf with a soft, tender crumb.
2. How to Mix the Banana Bread Batter Properly: Gentle, Quick, and Thorough
To avoid overmixing, focus on gently combining the wet and dry ingredients. The goal is to ensure that the flour is evenly incorporated without stirring the batter too much, which will keep the texture light and fluffy.
Steps for Proper Mixing:
- Combine Wet Ingredients First: Mix your wet ingredients—mashed bananas, eggs, butter, sugar, and any liquid ingredients—until smooth and well-combined.
- Add Dry Ingredients Gradually: Gradually fold in the dry ingredients (flour, baking soda, salt) using a rubber spatula or a wooden spoon. This method ensures the dry ingredients are evenly distributed throughout the wet ingredients without overworking the batter.
- Mix Until Just Combined: Stir the batter until you no longer see pockets of flour. Be mindful of the texture and stop mixing as soon as everything is incorporated. Lumps are okay! In fact, it’s often best if you leave a few flour pockets that will naturally dissolve as the bread bakes.
Tip: If you feel the urge to keep mixing, resist it! The more you stir, the denser your loaf will be. Keep it quick and gentle.
3. The Danger of Overmixing: A Dense, Heavy Loaf
If you allow yourself to overmix the batter, your banana bread will likely end up with a dense, heavy texture that’s far from ideal. Overmixing not only affects the structure of the bread but also disrupts the rise.
Signs of Overmixed Banana Bread:
- Flat, Dense Appearance: Overmixed batter often leads to banana bread that doesn’t rise well in the oven. The texture will feel heavier and compacted rather than light and airy.
- Tough Crumbs: The crumb structure of overmixed banana bread becomes chewy and tough, rather than soft and moist.
- Uneven Texture: When overmixing, the air pockets that help the bread rise and stay fluffy are broken down, resulting in a loaf that’s unevenly baked.
Tip: If your batter feels too thick or tough before baking, chances are you’ve overmixed it. A quick fix is to let the batter sit for a few minutes before baking so it has a little extra time to rest and relax before it hits the heat.
4. The Right Tools for Gentle Mixing
The tools you use when mixing the batter can impact how much you stir. Using the right utensils ensures that you don’t overmix, which helps in keeping the bread light and fluffy.
Best Tools for Mixing:
- Rubber Spatula or Wooden Spoon: These tools are great for folding the dry ingredients into the wet ones gently without overworking the batter. Avoid using a hand mixer or stand mixer for the entire process since it can overmix quickly.
- Whisk for Dry Ingredients: If you’re incorporating baking powder, baking soda, or spices, use a whisk to thoroughly mix these ingredients before adding them to the wet mixture. This ensures an even distribution without requiring a lot of stirring.
- Silicone Baking Mats or Parchment Paper: If you’re worried about overmixing in the pan, consider lining your loaf pan with parchment paper or a silicone baking mat. These materials allow you to gently tap the pan a few times after pouring the batter to eliminate air bubbles and give the bread a smoother texture.
5. What to Do If You Accidentally Overmix the Batter
It happens to the best of us—you get carried away, and the batter gets overmixed. But don’t worry! All is not lost. There are still a few tricks you can try to save your banana bread.
How to Salvage Overmixed Batter:
- Add a Little Extra Moisture: If you notice the batter is too thick or tough from overmixing, you can add a tablespoon of milk, yogurt, or extra mashed banana to help loosen it up. This will help retain some moisture and prevent the bread from drying out.
- Keep the Oven Temperature in Check: Bake the banana bread at a slightly lower temperature (e.g., 325°F instead of 350°F) to ensure it cooks slowly and has a better chance of rising evenly, even if the batter has been overmixed.
- Monitor the Baking Time: If the bread has become too dense, it might need a bit longer to cook through. Check for doneness by inserting a toothpick into the center of the loaf—it should come out clean or with a few moist crumbs.
Tip: If you’re uncertain whether you’ve overmixed the batter, it’s best to err on the side of caution and mix a little less. It’s much easier to mix a little more if needed than to recover from overmixing.
6. Why Overmixing Matters for Texture and Taste
Ultimately, avoiding overmixing is all about achieving the perfect texture and taste in your banana bread. The less you mix, the more air remains in the batter, which is critical for creating a fluffy, light loaf that has a soft crumb and an inviting, tender texture.
Texture Benefits of Not Overmixing:
- Airy Crumb: The goal of banana bread is to create a soft, airy crumb that isn’t weighed down by excessive gluten development. This is achieved by keeping the mixing to a minimum and allowing the leavening agents like baking soda to do their job.
- Moist Loaf: By gently mixing the batter, you preserve the moisture from the bananas, butter, and other ingredients. Overmixing pushes out some of this moisture and makes the loaf drier, even if it’s packed with ripe bananas.
Tip: Think of mixing your banana bread batter as a delicate dance—gentle and quick is key to keeping it light, airy, and perfectly textured.
Final Thoughts on Avoiding Overmixing
Avoiding overmixing your banana bread batter is one of the easiest ways to ensure a light, fluffy, and flavorful loaf. By mixing gently and only until the ingredients are just combined, you preserve the moisture and airiness that makes banana bread so irresistible. So, next time you’re in the kitchen, remember: slow and steady wins the race, and gentle mixing creates the perfect texture every time.
Check for Doneness Properly: Use the Toothpick Test
When baking banana bread, knowing when your loaf is perfectly done can be tricky, especially since the outside may look golden brown while the inside remains slightly undercooked. The toothpick test is the most reliable method for checking doneness and ensuring your banana bread turns out perfectly every time. Let’s dive into why this simple test is effective and how to do it correctly.
1. Why the Toothpick Test Works: A Simple and Accurate Method
The toothpick test works by checking the moisture level in the center of your banana bread, which is the part that takes the longest to cook through. It’s an easy, reliable way to confirm if your loaf is fully baked without the need for specialized tools.
How the Toothpick Test Helps:
- Checks the Center: Since banana bread is thick and moist, the middle of the loaf tends to take the longest to bake. A toothpick inserted into the center will allow you to check if the batter has set or if it’s still wet and undercooked.
- Signals Perfect Doneness: If the toothpick comes out clean or with just a few crumbs clinging to it, the bread is done. If it comes out wet or sticky, it needs a little more time in the oven.
- Prevents Overbaking: Checking with a toothpick lets you pull the loaf out of the oven as soon as it’s cooked through. If you rely solely on time, there’s a risk of overbaking, which could result in a dry, crumbly loaf.
2. How to Perform the Toothpick Test Correctly: The Right Technique
Performing the toothpick test properly is crucial to getting an accurate result. Here’s the best way to check for doneness without messing up your banana bread.
Step-by-Step Guide for the Toothpick Test:
- Step 1: Insert a toothpick or cake tester into the center of the banana bread. Be sure to place it in the thickest part of the loaf, which is typically near the center.
- Step 2: Gently pull the toothpick out and examine it. If the toothpick comes out with no batter or only a few moist crumbs sticking to it, the bread is done.
- Step 3: If the toothpick is wet or sticky, it means there’s still uncooked batter inside. Slide the loaf back into the oven and check again in 5-minute intervals.
- Step 4: Once the toothpick test is successful, remove the loaf from the oven and allow it to cool in the pan for at least 10 minutes before removing it to a wire rack.
Tip: When checking for doneness, make sure you’re not inserting the toothpick into any add-ins like chocolate chips or walnuts, as they may give you a false reading. Always focus on the batter itself.
3. What to Look for in the Toothpick: Crumbs vs. Wet Batter
Knowing what kind of results you should expect from the toothpick test is key to reading it correctly. A perfectly baked banana bread should yield a toothpick with a clean or slightly crumb-covered tip.
What Should the Toothpick Look Like?
- Clean Toothpick: If the toothpick comes out completely clean with no visible batter, it’s a sign that the bread is fully baked and ready to come out of the oven.
- Few Moist Crumbs: A few moist crumbs clinging to the toothpick are a good sign. This means the bread is cooked through, but still has a nice, moist crumb inside. It’s perfectly fine for the bread to have a few bits of banana or crumbs stuck to the toothpick.
- Wet Batter: If the toothpick comes out wet or coated in raw batter, the bread is not done yet. The batter hasn’t fully set, and you’ll need to bake it for a bit longer.
Tip: If your toothpick comes out with too many moist crumbs, it’s often a good indication that the banana bread is moist and tender, which is exactly what you want. Just make sure there’s no wet batter attached.
4. Don’t Rely on Time Alone: Every Oven Is Different
Oven temperatures can vary widely, so the suggested baking time in a recipe is only an estimate. This is why it’s essential to use the toothpick test, especially if you’re baking at a slightly lower or higher temperature than the recipe suggests.
Why Time Can Be Deceptive:
- Oven Variations: If your oven runs hotter or cooler than average, your banana bread might bake faster or slower than the recipe’s suggested time. The toothpick test helps you make adjustments based on your specific oven conditions.
- Bread Size: If you’re baking in a different-sized pan or a thicker loaf, the baking time will differ. The toothpick test ensures that the center is fully cooked, regardless of the pan used.
- Altitude: If you’re baking at high altitudes, the temperature and moisture levels can cause the bread to bake unevenly. Relying on the toothpick test ensures that you get a perfectly baked loaf, no matter where you live.
Tip: Start checking for doneness a few minutes before the minimum suggested baking time. This will give you enough time to catch the bread at the perfect moment.
5. Signs That the Bread Needs More Time: Fixing Underbaked Banana Bread
If you find that your banana bread is not done after the first toothpick test, don’t panic. It’s normal for some loaves to require extra time in the oven.
What to Do If the Bread Isn’t Done:
- Return It to the Oven: If the toothpick comes out with raw batter, put the bread back in the oven for an additional 5–10 minutes. Make sure to check every 5 minutes, as overbaking can lead to a dry loaf.
- Cover with Foil: If the top of the bread starts to brown too quickly before the inside is fully cooked, loosely cover it with aluminum foil to prevent burning while allowing the loaf to bake through.
- Lower the Temperature: If your oven is running hot, consider lowering the temperature by 10-15°F and continue baking. This will allow the bread to cook more evenly without burning the crust.
Tip: If you’re using a convection oven, keep in mind that it tends to bake faster, so check the banana bread a little earlier than the recipe suggests.
6. Signs the Bread Is Done: Soft, Moist, and Golden
Once the toothpick test confirms that your banana bread is fully baked, remove it from the oven and let it cool to perfection. A perfectly baked loaf will be golden brown, with a crisp top and a moist, tender crumb inside.
What to Expect When Banana Bread Is Fully Baked:
- Golden, Firm Crust: The crust should have a beautiful, golden-brown hue, and it should feel slightly firm to the touch.
- Even Crumb: The bread’s interior should be moist but not wet, with a soft and even crumb throughout.
- Fragrant Aroma: The air will be filled with the irresistible aroma of freshly baked banana bread, letting you know it’s just right!
Tip: Let your banana bread cool for at least 10 minutes in the pan before removing it. This helps the loaf set and prevents it from falling apart when you try to take it out of the pan.
Final Thoughts on the Toothpick Test
In conclusion, the toothpick test is the most reliable and simple way to check for doneness when baking banana bread. By inserting a toothpick into the center of the loaf and observing the results, you’ll know exactly when your banana bread is cooked to perfection. Avoid relying on time alone, and make sure to check your loaf a few minutes before the suggested bake time. This ensures that you’ll enjoy a moist, fluffy, and perfectly baked banana bread every single time.
Enhance the Flavor: A Pinch of Cinnamon or a Swirl of Peanut Butter Can Take It to the Next Level
One of the best things about making banana bread is how versatile it is! The basic banana bread recipe can easily be transformed with just a few additional ingredients or flavorings, creating a loaf that feels fresh, exciting, and perfectly suited to your taste preferences. While banana bread is already packed with natural sweetness and banana flavor, enhancing the flavor profile with spices, extracts, or fun add-ins can make it feel like a completely new creation. Let’s dive into some exciting ways to enhance the flavor and take your banana bread to the next level.
1. Cinnamon: A Warm Spice for Comforting Flavor
A pinch of cinnamon can work wonders in elevating the flavor of your banana bread, bringing in a warm, sweet, and slightly spicy kick. Cinnamon is a go-to spice that pairs beautifully with bananas, making it the perfect choice to complement the natural sweetness of the fruit. Adding this spice doesn’t just increase the flavor depth, it also creates an inviting aroma as the bread bakes.
How Cinnamon Enhances the Banana Bread:
- Warmth & Sweetness: Cinnamon brings out the natural sweetness of the ripe bananas, creating a comforting, cozy flavor that’s perfect for cold weather or holiday baking.
- Complex Flavor Profile: Even a small pinch of cinnamon can make your banana bread taste more sophisticated and balanced, especially when combined with the bananas’ richness.
- Aromatic Appeal: As the bread bakes, the scent of cinnamon fills your kitchen, making the experience even more delightful.
How to Use Cinnamon:
- In the Batter: Simply add about ½ to 1 teaspoon of ground cinnamon to the dry ingredients before mixing them with the wet ingredients. You can even increase the amount slightly if you prefer a more prominent cinnamon flavor.
- Topping: For an extra touch of spice, you can sprinkle a bit of cinnamon on top of the batter just before baking for a hint of flavor on the crust.
- Cinnamon Swirl: If you’re feeling adventurous, try adding a cinnamon swirl by mixing a cinnamon-sugar combination and swirling it into the batter before baking. This creates a beautiful marbled effect that’s as tasty as it is visually appealing.
2. Peanut Butter: Creamy, Nutty Goodness
If you’re a peanut butter lover, adding a swirl of peanut butter to your banana bread recipe can be a game-changer. Peanut butter adds a rich, creamy texture and a savory nutty depth that balances out the sweetness of the bananas, resulting in a perfectly well-rounded flavor. The best part? It’s easy to do and offers a bit of indulgence with each bite!
How Peanut Butter Enhances the Banana Bread:
- Creamy Texture: Peanut butter adds a velvety richness to the bread that makes it even more moist and tender. This enhances the mouthfeel, making each bite irresistible.
- Nutty Flavor: The distinct flavor of peanut butter brings a savory element that complements the sweetness of the bananas, creating a perfect balance between sweet and salty.
- Unexpected Twist: Adding peanut butter introduces a fun twist to the classic banana bread flavor. It’s the perfect way to surprise your guests or make your banana bread more unique.
How to Use Peanut Butter:
- Swirl it In: Gently warm up ½ cup of peanut butter and swirl it into the batter just before baking. Use a knife or spoon to create a marbled effect that runs through the loaf.
- Layer it on Top: After pouring the batter into the loaf pan, dollop spoonfuls of peanut butter on top, then use a knife to swirl it into the surface. This gives the bread an extra boost of flavor and a beautiful, marbled appearance.
- Add Peanut Butter Chips: For an even nuttier flavor, consider adding peanut butter chips or chopped peanuts into the batter. This will add crunch and enhance the peanut flavor with every bite.
3. Other Flavor-Enhancing Additions
While cinnamon and peanut butter are two popular flavor boosters, there are many more ingredients you can add to your banana bread for exciting twists and flavor boosts. The beauty of banana bread lies in how easily customizable it is to suit your taste or dietary preferences.
Other Flavor-Enhancing Options:
- Chocolate Chips: Add a handful of semi-sweet, milk, or dark chocolate chips to the batter for a decadent chocolate-banana combination. For a deeper, more complex flavor, try adding cocoa powder to the dry ingredients for a hint of chocolate in the bread itself.
- Maple Syrup or Honey: A few tablespoons of maple syrup or honey can enhance the overall sweetness and add a natural, caramel-like flavor to the bread. These alternatives bring a rich, nuanced sweetness without overwhelming the natural flavors of the bananas.
- Vanilla Extract: Add a teaspoon of vanilla extract for extra depth and a subtle floral sweetness. Vanilla complements both the bananas and the cinnamon, making the loaf taste more complex and balanced.
- Nutmeg: For a slightly more aromatic flavor, you can experiment with nutmeg alongside cinnamon. Nutmeg has a warm, sweet-spicy flavor that blends well with both bananas and cinnamon.
- Coconut Flakes: For a tropical twist, mix in some shredded coconut. This not only enhances the flavor but adds texture and chewiness that contrasts nicely with the soft banana bread crumb.
How to Use These Additions:
- Chocolate Chips: Mix ½ to 1 cup of chocolate chips into the batter or sprinkle them on top before baking.
- Maple Syrup/Honey: Replace a small amount of sugar with 2-3 tablespoons of maple syrup or honey to boost the sweetness.
- Vanilla/Spices: Stir in 1 teaspoon of vanilla extract or ¼ teaspoon of ground nutmeg into the wet ingredients.
- Coconut Flakes: Add ½ cup of shredded coconut to the batter for a chewy, tropical flavor.
4. The Power of a Few Extra Ingredients: Unleashing Your Creativity
One of the best things about banana bread is that you can truly make it your own. Once you master the basic recipe, experimenting with flavor enhancements is the next step to elevate your creation. From spices and spreads to fruits and nuts, you have endless options to customize your banana bread to match your cravings.
Benefits of Enhancing the Flavor:
- Unique Variations: By adding different flavorings, you can create a unique loaf each time, whether you’re craving a more spiced version, something more decadent, or a healthy twist.
- Personalized Touch: Whether you’re baking for a special occasion or just for yourself, the ability to personalize the flavor means you can tailor the bread to your specific tastes and preferences.
- Creative Presentations: Flavor enhancements like chocolate chunks, cinnamon sugar, or even a drizzle of glaze on top can make your banana bread look as good as it tastes—perfect for gifting or serving at a brunch.
Tip: Don’t be afraid to get creative and mix and match different additions to see what flavors work best for you. You may discover a new favorite combination that becomes your signature banana bread!
Final Thoughts on Flavor Enhancements
Incorporating a pinch of cinnamon, a swirl of peanut butter, or other exciting ingredients into your banana bread will completely elevate the flavor, transforming a simple recipe into something special. Whether you go for warm spices, indulgent chocolate, or nutty spreads, these enhancements offer the perfect way to personalize your loaf and take it to new heights. Experimenting with different flavors is part of the fun of baking—so don’t hesitate to get creative and make your banana bread uniquely yours.
Storing & Freezing Banana Bread.
How to Store at Room Temperature: Wrap It Well to Keep It Fresh for Days
Banana bread is one of those baked goods that tastes even better the next day, as the flavors meld and the texture becomes perfectly moist. To enjoy your banana bread at its freshest, proper storage is key. Storing it at room temperature is often the best option if you plan to enjoy it within a few days. Here’s how to keep your banana bread fresh, soft, and delicious without worrying about it drying out or going stale.
1. Why Room Temperature Storage Works Best
Banana bread has a moist, dense texture that allows it to stay fresh for a few days without refrigeration. When stored properly at room temperature, banana bread retains its moistness, softness, and flavor, making it perfect for enjoying slices over several days.
Benefits of Room Temperature Storage:
- Maintains Moisture: The moist texture of banana bread is better preserved at room temperature than in the fridge, where the cold can dry it out.
- Convenience: Storing it on the counter or in a breadbox makes it easy to grab a slice when you’re in the mood for a snack, breakfast, or dessert.
- No Loss of Flavor: Unlike some baked goods that can lose flavor when chilled, banana bread retains its rich taste when stored at room temperature.
2. Proper Wrapping: The Key to Freshness
To keep your banana bread fresh and moist, it’s important to wrap it properly. Proper wrapping prevents the bread from becoming exposed to air, which can lead to it drying out or going stale. Here’s how to wrap and store it effectively:
How to Wrap Your Banana Bread:
- Plastic Wrap or Aluminum Foil: Wrap the loaf tightly in plastic wrap or aluminum foil. This helps create a seal that keeps moisture inside while preventing the bread from drying out. If you’re storing individual slices, wrap each one separately for convenience.
- Parchment Paper or Wax Paper: You can also wrap banana bread in parchment paper or wax paper before covering it with foil or plastic wrap. These materials provide an extra layer of protection and help preserve the texture.
- Resealable Plastic Bag: Another option is placing the whole loaf or individual slices in a resealable plastic bag. Make sure to press out as much air as possible to keep the bread fresh.
- Breadbox: If you have a breadbox, it’s an ideal container for banana bread. Breadboxes are designed to allow air circulation while keeping the bread in a controlled environment. Just make sure the lid is on tightly to keep the bread from drying out.
Tip: For added freshness, consider wrapping the banana bread in wax paper, followed by a layer of foil or placing it in a bag, so it has double protection against air exposure.
3. Storing Sliced Banana Bread
If you prefer to slice your banana bread before storing it, that’s perfectly fine! Just be sure to wrap the slices individually or stack them in a way that keeps them from drying out. Here’s how to do it:
Slicing and Storing Slices:
- Individual Wraps: Wrap each slice tightly in plastic wrap or wax paper. This will keep each slice from losing moisture and will make it easy to grab a piece whenever you’re craving banana bread.
- Stacking & Wrapping: If you prefer to stack slices together, be sure to wrap the entire stack tightly in plastic wrap or aluminum foil. You can also place parchment paper between the slices to prevent them from sticking together and making it easier to remove a slice without breaking the loaf.
- Resealable Bags: If you slice the loaf, placing the slices into a resealable plastic bag is an efficient way to store them. This method is great if you want to store individual portions for easy access.
Tip: Storing banana bread in slices helps the bread stay fresh, especially when you’re not consuming the entire loaf right away.
4. Optimal Room Temperature: Keep It Cool and Dry
When storing banana bread at room temperature, choosing the right environment is key to maintaining its freshness.
Best Conditions for Room Temperature Storage:
- Cool and Dry Place: Store your wrapped loaf in a cool, dry area like a kitchen counter or breadbox, away from direct sunlight or heat sources like the stove or microwave. Heat can cause the bread to dry out and affect the texture.
- Avoid Humid Environments: While banana bread loves moisture, storing it in a humid area can promote mold growth. Make sure the bread is well wrapped to prevent moisture from entering or leaving the package.
- No Refrigeration Needed: Since banana bread is dense and moist, it can safely be stored at room temperature for several days. The refrigerator can make it dry and less enjoyable, so unless you plan to keep it for more than a week, avoid chilling it.
5. How Long Can You Keep It at Room Temperature?
Properly stored banana bread can last for several days at room temperature, but you do want to keep an eye on its freshness.
How Long Will Banana Bread Stay Fresh?
- 2–3 Days: If your banana bread is tightly wrapped and stored in a cool, dry place, it will stay fresh for up to 3 days. After that, it may begin to lose moisture and flavor.
- Signs of Staleness: As banana bread sits, it will start to dry out. If the crust feels tough, or if it has lost its moist, tender texture, it’s time to move it to the freezer or toss it.
Tip: If you don’t think you’ll finish the loaf in a few days, it’s best to store it in the freezer to preserve its freshness.
6. Freezing for Long-Term Storage
If you need to store banana bread for longer than 3 days, the freezer is your best option to keep the loaf fresh and prevent it from going stale.
How to Freeze Banana Bread:
- Wrap Well: For freezing, wrap the banana bread loaf tightly in plastic wrap, followed by aluminum foil. You can also store slices in a resealable plastic bag for easy portioning.
- Label and Date: If you plan to store banana bread for more than a few weeks, label the wrapping with the date so you know when it was frozen.
- Thawing: When you’re ready to enjoy it, simply remove the bread from the freezer and let it thaw at room temperature for a few hours. For individual slices, you can even microwave them for a few seconds for a quick warm-up.
Tip: Banana bread can stay in the freezer for up to 3 months without compromising the flavor or texture.
Final Thoughts on Storing Banana Bread
Properly storing your banana bread at room temperature can help you enjoy it fresh and moist for several days. By wrapping it securely, choosing the right storage environment, and ensuring it’s not exposed to air, you can extend the life of your homemade loaf. If you can’t finish it in a few days, freezing it is a great option to preserve the freshness and enjoy banana bread later. With these simple storage tips, your banana bread will stay delicious, soft, and ready to be enjoyed whenever you want.
Refrigeration Tips: Extend Shelf Life While Maintaining Moisture
While storing banana bread at room temperature is often the go-to method for keeping it fresh for a few days, refrigeration can be a great option if you need to extend the shelf life of your loaf for longer than 3 days. However, refrigerating banana bread can sometimes cause it to dry out, so it’s important to follow the right techniques to keep it moist, flavorful, and tender while extending its freshness. Here’s how to properly store banana bread in the fridge to preserve its quality.
1. Why Refrigerate Banana Bread?
Banana bread naturally has a high moisture content, making it prone to spoilage if left out too long, especially in a humid environment. Refrigerating it can slow down the growth of mold and prevent it from spoiling too quickly. While refrigeration can cause banana bread to become slightly firmer or drier than when stored at room temperature, there are ways to counteract these effects and keep the bread as fresh as possible.
Benefits of Refrigeration:
- Extended Shelf Life: Refrigeration helps preserve the bread for up to 1 week by keeping it from spoiling, making it an excellent option for longer-term storage.
- Prevents Mold Growth: Storing banana bread in the fridge slows down the growth of mold and bacteria, especially in warmer or humid environments.
- Good for Leftovers: If you have a large loaf or a leftover portion, refrigeration can help ensure that it doesn’t go bad before you get to finish it.
2. Proper Wrapping: Keep It Moist and Fresh
The key to maintaining the moisture and texture of banana bread when refrigerating it is proper wrapping. Without airtight wrapping, the bread can dry out quickly in the fridge, making it less enjoyable when you finally slice it. Properly sealing the bread in moisture-retaining materials is crucial.
How to Wrap Banana Bread for Refrigeration:
- Plastic Wrap: The most effective way to preserve banana bread’s moisture in the fridge is by wrapping it tightly in plastic wrap. The wrap seals in the bread’s natural moisture, preventing it from drying out in the cold environment.
- Aluminum Foil: After wrapping in plastic wrap, you can add an extra layer of aluminum foil for added protection. The foil helps keep moisture in and prevents the bread from absorbing any odors from the fridge.
- Resealable Plastic Bag: For additional protection, you can place the wrapped banana bread into a resealable plastic bag. Press out as much air as possible to avoid the bread being exposed to excess air or moisture.
- Wax or Parchment Paper: If you don’t have plastic wrap, wrapping banana bread in wax paper or parchment paper can also work. Just make sure to cover it well with foil or store it in a plastic bag to create a tight seal.
Tip: Wrapping banana bread as tightly as possible prevents it from absorbing moisture from the fridge, which can lead to sogginess, or from drying out.
3. Refrigeration Container: Choosing the Right Option
Sometimes, using a container can be just as effective as wrapping, especially if you’re dealing with multiple slices or an already sliced loaf. The right container helps keep the bread moist without affecting the texture too much.
How to Store in a Container:
- Airtight Container: For sliced banana bread, an airtight container is an excellent option. The container will lock in moisture while allowing the bread to stay fresh for a longer time. Make sure it’s not too large, as extra space can cause the bread to dry out.
- Breadbox: If your fridge has a breadbox or storage space with consistent airflow, you can also use that for storage. However, make sure it’s covered or sealed properly to retain moisture.
Tip: Even when using a container, ensure it is airtight to prevent the bread from drying out or picking up fridge odors.
4. The Ideal Storage Temperature in the Fridge
Banana bread should be stored in the fridge at a consistent temperature of about 35–40°F (1.5–4.5°C). Storing it in the coldest section of the fridge helps prevent it from softening or becoming overly moist while also slowing down the spoilage process. Avoid placing it near the fridge door, where the temperature fluctuates.
Best Fridge Zones for Banana Bread:
- Middle Shelf: The middle shelf of the fridge maintains the most stable temperature, making it ideal for storing banana bread without temperature fluctuations.
- Back of the Fridge: For longer-term storage, placing banana bread towards the back of the fridge helps it stay colder and fresher longer.
5. Reheating Refrigerated Banana Bread
Once you take your banana bread out of the fridge, it can be a bit firmer or drier due to the cool storage temperature. To revive it and restore some of its softness and flavor, reheating is an excellent option.
How to Reheat Refrigerated Banana Bread:
- Microwave: If you’re in a rush and need a quick snack, you can microwave a slice of banana bread for 10–15 seconds. This will soften it up and make it warm and cozy, perfect for breakfast or a quick treat.
- Oven: For a more thorough reheat that helps restore the crust, wrap the loaf or slices in foil and place it in a preheated 350°F (175°C) oven for 10–15 minutes. This helps the bread warm evenly and retain its moisture.
- Toaster Oven: If you’re only reheating a few slices, a toaster oven works perfectly. Set it to 300°F (150°C) and toast for 5–10 minutes until warm and soft.
6. How Long Can You Store Banana Bread in the Fridge?
While refrigeration extends the shelf life of banana bread, it will still eventually start to lose its freshness and moisture.
How Long Will It Stay Fresh?
- Up to 1 Week: Properly wrapped banana bread can last in the fridge for up to 1 week. After this time, it will start to dry out and lose its flavor.
- Signs of Staleness: If the bread begins to feel overly dry, has an off smell, or develops visible mold, it’s time to toss it. But if it’s just a little firmer than fresh banana bread, you can always warm it up to enjoy.
Tip: Label your banana bread with the date it was placed in the fridge so you can keep track of its freshness.
7. Freezing Banana Bread for Longer Storage
If you know you won’t be able to finish your refrigerated banana bread within a week, or if you want to save some for later, freezing is the best option. Freezing banana bread locks in the freshness and extends the shelf life by months.
How to Freeze Banana Bread:
- Wrap Tightly: Wrap the banana bread tightly in plastic wrap, followed by a layer of aluminum foil. This prevents freezer burn and moisture loss.
- Slice for Convenience: If you’ve already sliced the loaf, freezing individual slices allows you to take out only as much as you need at a time.
- Label and Date: Label the bread with the date before freezing to help track how long it’s been in the freezer. Frozen banana bread is best used within 3 months.
Final Thoughts on Refrigeration
Refrigerating banana bread can be an effective way to extend its shelf life, but it requires proper wrapping, careful storage temperature, and consideration of texture changes. By following these refrigeration tips, you can keep your banana bread fresh for up to a week, while still maintaining its delicious flavor and moisture. If you need to store it longer, freezing is always a great option for preserving the loaf’s quality and taste. Whether you refrigerate or freeze, your banana bread will be ready to enjoy whenever you’re craving a slice.
Freezing Instructions: Best Way to Freeze and Reheat for Later Enjoyment
Freezing banana bread is the perfect solution when you have a leftover loaf or if you want to bake in advance for a later date. Properly freezing banana bread allows you to preserve its freshness, moisture, and flavor for months. Whether you have a whole loaf or individual slices, you can easily freeze banana bread, saving it for a busy day or when a craving strikes. Let’s dive into the best practices for freezing banana bread and how to reheat it so you can enjoy it just as fresh as the day it was baked!
1. Why Freezing Works Well for Banana Bread?
Banana bread is an ideal candidate for freezing because of its dense, moist texture, which helps it retain its quality over time. When frozen properly, banana bread maintains its fluffiness, moisture, and flavor, allowing you to enjoy a delicious slice even months after baking. Freezing also extends its shelf life, preventing it from going stale before you can finish it.
Benefits of Freezing Banana Bread:
- Long-Term Storage: Freezing banana bread allows you to preserve it for up to 3 months without compromising its flavor or texture.
- Portion Control: Freezing individual slices or small portions lets you enjoy banana bread as a quick snack whenever you like without having to thaw the whole loaf.
- Convenience: Baking banana bread in advance and freezing it makes for a convenient snack, breakfast, or dessert option when you’re short on time.
2. Best Way to Freeze Banana Bread
To ensure your banana bread remains moist, flavorful, and in the best possible condition, it’s essential to follow the correct freezing methods. Here are some tried-and-tested steps for freezing your loaf or slices:
How to Freeze Whole Banana Bread Loaf:
- Cool Completely: Before freezing, make sure your banana bread has cooled completely at room temperature. Freezing warm bread can lead to moisture loss, resulting in a soggy texture when reheated.
- Wrap in Plastic Wrap: Once cooled, wrap the entire loaf tightly in plastic wrap. This helps lock in the bread’s moisture and protects it from freezer burn.
- Double Wrap with Foil: After wrapping in plastic wrap, add a layer of aluminum foil around the loaf. The foil provides an additional layer of protection and keeps the loaf sealed from freezer odors.
- Label & Date: Don’t forget to label the package with the date you froze it. This helps you track how long it’s been in the freezer, ensuring you consume it within the best timeframe.
How to Freeze Individual Slices:
- Slice the Loaf: If you prefer to freeze individual slices, start by cutting the banana bread into slices. This allows you to thaw only the amount you need.
- Wrap Each Slice: Wrap each slice individually in plastic wrap. This makes it easy to grab a slice at a time without needing to thaw the entire loaf.
- Place in a Freezer Bag: Once each slice is wrapped, place the slices in a resealable freezer bag or airtight container. Press out excess air from the bag to reduce the risk of freezer burn.
- Label & Date: As with the whole loaf, label the bag or container with the date of freezing.
Tip: If you have several slices, you can layer them between parchment paper to prevent them from sticking together while freezing.
3. How Long Can You Freeze Banana Bread?
Banana bread can be stored in the freezer for a long time, but to enjoy it at its best, it’s recommended to consume it within a certain time frame.
How Long Will Frozen Banana Bread Last?
- Up to 3 Months: For optimal freshness and taste, banana bread can stay in the freezer for up to 3 months. After this time, while it’s still safe to eat, the quality may begin to deteriorate.
- Signs of Freezer Burn: If the bread develops ice crystals inside the packaging or appears overly dry, it may be a sign of freezer burn. While not harmful, freezer burn can affect the texture and flavor, so it’s best to consume the bread within the recommended timeframe.
4. Reheating Frozen Banana Bread
Reheating frozen banana bread correctly is crucial to ensure it’s as soft, moist, and flavorful as the day it was baked. You can thaw and reheat banana bread using various methods depending on your time and preference.
How to Thaw & Reheat Whole Loaf:
- Overnight Thawing: The best method for thawing banana bread is to allow it to thaw overnight in the refrigerator. This keeps it at a consistent temperature, preventing condensation that can make it soggy.
- Quick Thawing: If you need it sooner, you can thaw the loaf at room temperature for about 2-3 hours. Remove the plastic wrap and foil before letting it rest.
- Oven Reheating: To get a warm, soft banana bread with a slight crispiness on the outside, wrap the loaf in aluminum foil and place it in a preheated 350°F (175°C) oven for 10-15 minutes. This method ensures the bread is evenly heated without drying out.
How to Reheat Individual Slices:
- Microwave: For a quick snack, place a slice in the microwave for 15-20 seconds. This will warm the bread and revive its moist texture.
- Oven or Toaster Oven: If you prefer a slightly crispy edge, reheat slices in a preheated oven or toaster oven at 300°F (150°C) for 5-7 minutes. This keeps the slice soft on the inside while adding a bit of crunch on the outside.
Tip: When reheating banana bread, avoid using too much heat, as it can dry out the loaf. Low, gentle heat is key to keeping it moist and soft.
5. Can You Refreeze Banana Bread?
Refreezing banana bread is generally not recommended. When you thaw and then refreeze banana bread, it can lead to a loss of texture and flavor, as the bread’s moisture is compromised each time it’s thawed and refrozen. If you plan to freeze banana bread in portions, make sure to only thaw the amount you intend to use at one time to avoid the need for refreezing.
6. Tips for Maintaining Freshness When Freezing Banana Bread
To ensure your banana bread remains as delicious as the day it was baked, here are a few extra tips for freezing and reheating:
Best Practices for Freezing Banana Bread:
- Freeze as Soon as Possible: For the best flavor and texture, freeze banana bread as soon as possible after it cools. This locks in the moisture and flavor, preserving its freshness.
- Use a Freezer-Safe Bag or Container: Always use freezer-safe bags or airtight containers to prevent freezer burn and protect the bread from picking up odors from other frozen foods.
- Label and Date Your Freezer Bags: Always label each package with the date you froze the bread to help keep track of its freshness. This way, you’ll know exactly how long it’s been in the freezer.
Final Thoughts on Freezing Banana Bread
Freezing banana bread is a simple and effective way to preserve its moisture, flavor, and freshness. By following these freezing and reheating tips, you can enjoy a slice of banana bread any time you like—whether it’s weeks or months after baking. Whether you freeze it whole, in slices, or as individual portions, your banana bread will stay fresh and delicious, ready to be warmed up for a comforting snack or treat whenever the craving strikes.
Conclusion: Simple, Delicious, and Foolproof Banana Bread
This Easy Banana Bread Recipe truly delivers on its promises of simplicity and deliciousness. With just a handful of basic ingredients and a few simple steps, you can bake a loaf of banana bread that’s moist, fluffy, and bursting with natural sweetness. Whether you’re an experienced baker or just starting out, this recipe is foolproof and guaranteed to impress.
There’s something incredibly satisfying about enjoying a warm slice of banana bread, whether it’s for breakfast, a snack, or a sweet dessert. And the best part? It’s easily customizable with add-ins like walnuts, chocolate chips, or a touch of cinnamon to make it even more exciting.
We’d love to hear about your experience with this recipe! Give it a try and share your thoughts or variations in the comments below. Did you add something extra to make it your own? Leave a comment, and don’t forget to share the recipe with your friends and family. Happy baking.