

When snow blankets the ground, there’s no better time to whip up a batch of homemade snow ice cream! This fun and nostalgic treat transforms freshly fallen snow into a sweet, creamy dessert using just a few simple ingredients you probably already have in your kitchen. Whether you’re making it for the kids on a snow day or indulging in a little winter magic yourself, this snow ice cream recipe is quick, easy, and irresistibly delicious.
With only 4 ingredients and no fancy equipment required, it’s the perfect way to enjoy the season and create lasting memories. In this post, I’ll show you how to make snow ice cream step-by-step, share tips for safe snow gathering, and offer fun flavor twists you can try at home. Let’s turn that snow into a bowl of joy!
What Is Snow Ice Cream?
WHO Guidelines on Food Safety and Clean Snow Usage
What Makes Snow Ice Cream Unique?
Snow ice cream stands out from traditional ice cream for several reasons—starting with its main ingredient: fresh snow! Instead of churning cream and eggs for hours, snow ice cream is made in minutes by simply mixing clean snow with a few pantry staples like milk, sugar, and vanilla extract.
What makes it truly special is the texture—light, fluffy, and melt-in-your-mouth smooth. It’s not as dense as store-bought ice cream and has a delicate consistency that gives it a soft, slushy feel. Because snow melts quickly, this treat is meant to be enjoyed fresh and fast, adding to the spontaneous joy of making it during a snowfall.
Another reason snow ice cream is so unique? It’s often tied to fond childhood memories and the simple magic of snow days. There’s something wonderfully nostalgic about scooping snow straight from the backyard and turning it into dessert. It’s more than just a recipe—it’s a fun winter tradition, a playful activity for families, and a creative way to turn nature into something tasty.
Whether you’re making it with your kids, friends, or just for yourself, snow ice cream is a celebration of the season and proof that some of the best desserts come from the simplest ingredients.
A Nostalgic Winter Treat for All Ages
There’s something truly heartwarming about snow ice cream—it’s one of those rare treats that brings joy across generations. For many, the very idea of scooping up fresh snow and turning it into dessert sparks a flood of childhood memories: snowball fights, sledding down hills, and the excitement of a school snow day. It’s a tradition that’s been passed down for decades, often made with a simple recipe that requires no stove, no oven, and no waiting around.
Whether it was your grandmother who introduced you to the magic of snow day ice cream, or you discovered it on your own with a mixing bowl and a snowy gathering snow from just outside your door, this sweet treat perfectly embodies the playful spirit of winter. The beauty of it? You don’t have to be a kid to enjoy it. Adults love it just as much—for its simplicity, its taste, and the nostalgia it stirs.
Making snow ice cream is also a wonderful way to create new memories. It’s an easy, hands-on kitchen activity for kids, a cozy tradition for couples, and a throwback delight for anyone who wants to embrace the season in a sweet, carefree way. Whether you’re making it after a blizzard or during a light snowfall, snow ice cream is a delightful reminder that sometimes, the best things in life are the simplest—and the snowiest.
Is It Safe to Eat Snow? Safety Tips to Know
One of the most common questions about snow ice cream is: “Can you really eat snow?” Yes, you can enjoy snow in your dessert—as long as you follow a few easy safety guidelines. While freshly fallen snow can be safe to use in your recipes, it’s important to make sure you’re gathering it safely and from the right place.
Here are some helpful tips to keep your snow ice cream experience both fun and safe:
Use Freshly Fallen Snow
Always use clean, freshly fallen snow—ideally, collect it within a few hours of snowfall. The longer snow sits on the ground, the more likely it is to collect dirt, debris, or pollutants from the air.
Avoid Snow Near Roads or High-Traffic Areas
Never scoop snow from roadsides, sidewalks, driveways, or areas near cars or animals. These spots can be contaminated with chemicals like salt, antifreeze, or oil, which you definitely don’t want in your dessert.
Collect from a Clean, Elevated Surface
Use a clean bowl or scoop to collect snow from a safe, elevated spot—like a patio table, outdoor bench, or a clean spot in the yard. Steer clear of any snow that’s been walked on or has made contact with the ground.
Wash Hands & Use Clean Utensils
Treat snow ice cream prep like any other food project. Make sure hands and utensils are clean, especially if kids are helping out.
While snow isn’t something you’d eat every day, it can be enjoyed occasionally and safely with a little care. It’s a fun, natural ingredient that turns winter into an opportunity to create memories—and a sweet frozen treat!
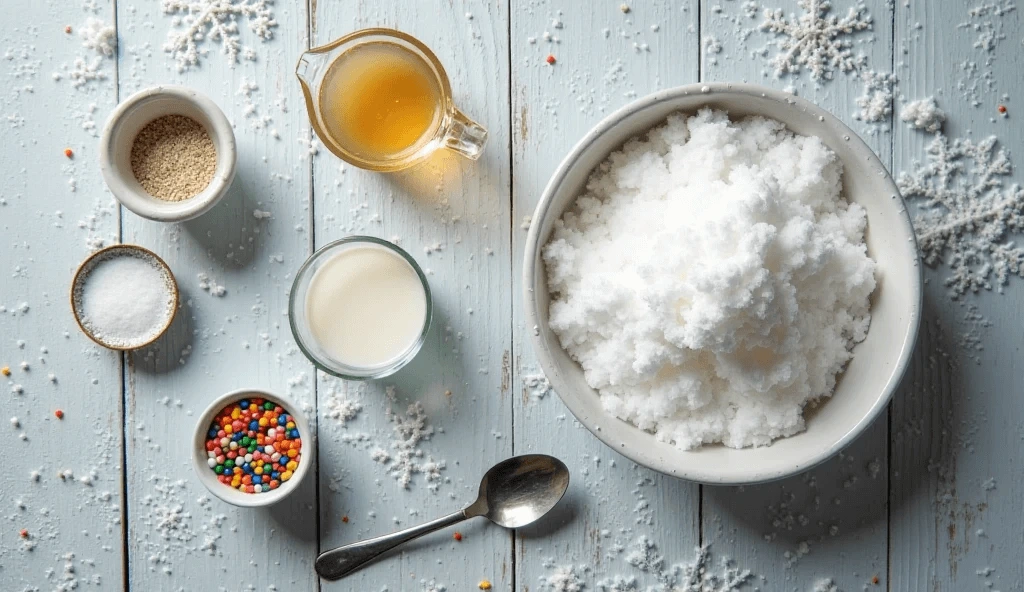
Ingredients You’ll Need (Only 4!)
Clean, Fresh Snow – How Much You Need
The star of the show in any snow ice cream recipe is, of course, snow! But not just any snow will do—you’ll want light, fluffy, freshly fallen snow that’s clean and untouched. Snow acts as the base for your ice cream, giving it that soft, airy texture, so it’s important to gather it correctly and in the right amount.
For a standard batch of snow ice cream that serves about 4 people, you’ll need roughly 8 to 10 cups of clean snow. That might sound like a lot, but keep in mind that snow is light and packs down once you mix it with your other ingredients. If you’re using more liquid (like condensed milk or cream), you may want to gather a bit more snow to keep the texture thick and scoopable.
Pro Tip:
When collecting your snow, use a large bowl or container and scoop from an elevated surface like a table or an untouched spot in your yard. AStay away from snow that’s been compressed, has a yellowish tint, or contains any dirt or debris.
Also, gather the snow just before you’re ready to mix—if you bring it inside too early, it can melt quickly or clump together, making it harder to get that fluffy, ice cream-like consistency.
In short: the fresher and fluffier the snow, the better your snow ice cream will taste. It’s all about embracing the moment and using the season’s gift to create a little homemade joy.
Milk, Sugar, and Vanilla Extract – Pantry Staples
While fresh snow is the star ingredient in snow ice cream, the other components—milk, sugar, and vanilla extract—are what transform it into a delicious, creamy dessert. These three pantry staples come together to give your snow ice cream the perfect balance of sweetness and smooth texture. Here’s how each one plays an essential role in making your snow ice cream both simple and irresistible:
Milk: The Base Liquid
Milk is the foundation of your snow ice cream’s texture. It helps bind the snowflakes together and gives the dessert its creamy, smooth consistency. You can use any type of milk, whether it’s whole milk, skim milk, or even dairy-free alternatives like almond milk or oat milk, depending on your preferences or dietary needs. If you’re aiming for a richer, more decadent ice cream, consider using half-and-half or even heavy cream. The key is to adjust the milk quantity based on how thick or creamy you want the final result.
Sugar: Sweetness in Every Bite
Sugar is what brings the sweetness to your snow ice cream. Granulated white sugar is the go-to choice because it dissolves easily in milk and snow. Depending on your taste, you can adjust the amount of sugar to suit your preferences, adding more for a sweeter treat or less if you’re aiming for a subtler flavor. If you prefer alternatives, you can experiment with honey, maple syrup, or even stevia for a different flavor profile. Keep in mind, though, that the sugar not only sweetens but also helps give the ice cream its smooth texture, preventing it from becoming too icy.
Vanilla Extract: A Flavor Enhancer
A splash of vanilla extract is what elevates your snow ice cream from just a fun snow day treat to something that tastes rich and sophisticated. Vanilla adds a warm, comforting flavor that balances out the sweetness from the sugar. You can use pure vanilla extract for the best quality flavor, or if you’re in a pinch, vanilla essence works too. For a twist, you can experiment with other extracts such as almond, coconut, or maple, depending on your taste preferences or the flavor profile you’re aiming for.
These three simple ingredients may seem basic, but together, they create the perfect base for snow ice cream. Whether you’re making it for the first time or perfecting your recipe, having these pantry staples on hand ensures that you can enjoy a sweet, homemade treat whenever the snow falls.
Optional: How to Use Condensed Milk Instead
While traditional snow ice cream recipes typically rely on milk, sugar, and vanilla extract, sweetened condensed milk is a fantastic option for those looking to add an extra level of richness and simplicity to their treat. Condensed milk is a thick, creamy milk product that has had most of its water removed and is sweetened during the process. It’s widely used in desserts because it provides both sweetness and creaminess in one convenient ingredient. Here’s why you might want to swap regular milk and sugar for condensed milk:
Why Choose Condensed Milk?
The biggest advantage of using sweetened condensed milk in your snow ice cream is the convenience and depth of flavor it brings. Because it’s already sweetened and thicker than regular milk, condensed milk simplifies your recipe by cutting down on the number of ingredients you need to combine. It also ensures a richer, creamier texture that’s closer to traditional ice cream, with no need to worry about dissolving sugar or balancing the milk-to-snow ratio. This can result in a smoother, more decadent dessert, and the condensed milk enhances the overall flavor with its natural caramel-like notes.
How to Use Condensed Milk in Your Snow Ice Cream
If you’re substituting sweetened condensed milk for regular milk and sugar, here’s a simple way to do it:
- Skip the sugar: Since condensed milk is already sweetened, you don’t need to add any extra sugar to your snow ice cream mixture.
- Adjust the quantity: You’ll want to replace the milk and sugar with about 1 can (14 oz) of sweetened condensed milk for every 8 to 10 cups of snow. This ensures the right balance of sweetness and creaminess.
- Mix with snow: Gently fold the condensed milk into the fresh snow, just as you would with regular milk. The texture will be thicker and more custard-like, which is perfect for those who prefer a richer consistency.
- Optional flavor boost: If you still want to add some vanilla extract or other flavorings, feel free! Condensed milk pairs wonderfully with flavors like vanilla, almond, or coconut, which will complement the sweet base beautifully.
Benefits of Using Condensed Milk
- Rich, creamy texture: The consistency is thicker, which results in a more ice cream-like dessert.
- Fewer ingredients to worry about: Skip the sugar and use one ingredient for both sweetness and texture.
- Easier for special diets: For those following a low-sugar or keto lifestyle, there are sugar-free versions of condensed milk available, making it easy to customize your snow ice cream to suit dietary needs.
In short, condensed milk is an excellent shortcut for making your snow ice cream even easier and creamier. It’s the perfect solution when you want to enjoy a luxurious, no-churn ice cream with minimal effort.
How to Make Snow Ice Cream Step-by-Step
1 Step : Gather Clean Snow (Freshly Fallen is Best!)
The first and most important step in making delicious snow ice cream is gathering clean, fresh snow. While it may sound simple, the quality of the snow you use is critical to the final result, both in terms of taste and texture. Fresh snow provides a light, fluffy base that makes your ice cream smooth and airy. Here’s how to get the best snow for your treat:
Why Fresh Snow is Best
Freshly fallen snow is typically lighter and fluffier, which makes it perfect for turning into snow ice cream. Older snow, or snow that has been sitting around for a while, tends to become packed down, making it denser and less ideal for the soft, creamy texture we want. If snow has had time to sit on the ground or has been exposed to the elements, it can also contain debris, dirt, or pollutants. These contaminants can affect the taste and safety of your snow ice cream, so it’s best to gather snow that’s as fresh and clean as possible.
Where to Gather Snow
Look for a clean, untouched area to gather your snow. Here are a few ideal spots:
- Outdoor tables or benches: These surfaces often catch fresh snow without contamination from the ground or foot traffic.
- Flat surfaces: Use a clean, flat surface like a patio table, car roof (if it’s not too dirty), or even a snowbank that hasn’t been disturbed.
- Avoid roadsides or driveways: Snow near roads and high-traffic areas can contain road salt, dirt, or chemicals, which you definitely don’t want in your snow ice cream.
How Much Snow to Collect
For a batch of snow ice cream that serves about 4 people, you’ll need approximately 8 to 10 cups of clean snow. While this may seem like a lot, snow is very light and will pack down quickly once you mix it with your other ingredients. When gathering snow, try to collect it just before you’re ready to mix. This ensures it’s as fresh as possible and hasn’t started to melt or form clumps.
Quality Over Quantity
The quality of the snow is far more important than the amount you collect. You can always add a little more snow to adjust the consistency of your ice cream, but if the snow is too wet or has already started melting, it can result in an icy, mushy texture that’s less enjoyable. Aim for light, fluffy snowflakes that are easy to scoop without too much moisture.
What to Do if Snow Starts Melting
If you’re gathering snow during warmer weather or if the snow is starting to melt, you may need to move quickly. Use a cold container to keep the snow at its best while you prepare your ingredients. If snow starts to melt as you gather it, it’s okay—but the resulting ice cream will have a different, more icy texture.
In short, the key to making great snow ice cream is gathering the freshest, fluffiest snow you can find. The cleaner and fluffier the snow, the better your dessert will be. So, go ahead and embrace the winter wonderland outside, and scoop up some snow for your sweet treat!
2 Step : Mix Your Base – Milk, Sugar, and Vanilla
Once you’ve gathered your fresh snow, it’s time to prepare the base of your snow ice cream. The beauty of this step is its simplicity—just three basic ingredients come together to create the perfect creamy, sweet, and flavorful mixture that will turn your snow into a delicious frozen treat.
Here’s a breakdown of how to mix the base for your snow ice cream:
Milk: The Creamy Foundation
Milk is the primary liquid that binds everything together and gives your snow ice cream its smooth, creamy texture. While you can use any kind of milk—whole, skim, or even plant-based alternatives like almond milk or oat milk—full-fat milk or half-and-half will yield the creamiest results. If you want a richer, more indulgent ice cream, you could even consider using heavy cream instead of milk.
To make your snow ice cream, pour about 1 to 1 ½ cups of milk into a mixing bowl. This will be the primary liquid, and it helps prevent the snow from freezing into icy chunks when combined.
Sugar: Sweetening the Snow
Sugar is essential for giving your snow ice cream the perfect level of sweetness. Regular granulated white sugar is the most common choice for this recipe, as it dissolves easily in the milk and snow mixture. Depending on your taste preferences, you can add 1/2 to 1 cup of sugar, adjusting it based on how sweet you want your ice cream to be. If you’re using sweetened condensed milk (as mentioned in a previous section), you can skip adding sugar, as condensed milk already has sweetness built in.
If you’re looking for an alternative sweetener, you can experiment with honey, maple syrup, or stevia. Just keep in mind that liquid sweeteners like honey or maple syrup may slightly change the texture of your ice cream, making it a bit more gooey rather than firm.
Vanilla Extract: The Flavor Enhancer
A splash of vanilla extract adds a lovely, warm flavor to your snow ice cream, enhancing its sweetness without overpowering the natural taste of the snow. Pure vanilla extract is always the best choice for a high-quality flavor, but vanilla essence works fine as a more affordable alternative.
Add 1 teaspoon of vanilla extract to your base mixture. You can also experiment with other extracts—such as almond, coconut, or even maple—to give your snow ice cream a fun twist. These additional flavors can add complexity to the dessert and complement the sweetness of the sugar and milk.
Mixing the Base Together
Once you’ve gathered your milk, sugar, and vanilla, whisk everything together in a bowl until the sugar is fully dissolved. This will create a smooth, homogeneous mixture. You can adjust the sugar level to taste, so feel free to sample the base before mixing it with your snow. If you like it sweeter, add more sugar; if you prefer a subtler flavor, cut back on the sugar a bit.
Pro Tip:
For extra creaminess, use a hand mixer or whisk vigorously for about 30 seconds to help incorporate air into the mixture. This will help ensure a lighter, fluffier texture for your snow ice cream.
Why This Step is Important
Mixing the base properly is crucial because it determines the final consistency and flavor of your snow ice cream. The right balance of milk, sugar, and vanilla ensures that your snow ice cream is neither too icy nor too watery. It also gives the dessert a rich, creamy texture and a sweet, comforting flavor that complements the cold snow perfectly.
With your base mixed, you’re ready for the fun part: folding it into your clean, fluffy snow! By mixing the base before adding the snow, the flavors blend together seamlessly, resulting in a well-balanced and cohesive dessert.
3 Step : Mix and Serve – Quick and Delicious!
Now that you’ve gathered fresh, clean snow and prepared your sweet base of milk, sugar, and vanilla, it’s time to bring everything together. This step is fast and simple, but it’s where the magic happens, transforming your snow and creamy base into a smooth, indulgent treat. Best of all, it only takes a few minutes to mix, and you’ll be ready to enjoy your homemade snow ice cream!
Combine the Snow and Creamy Base
The key to making delicious snow ice cream is how you combine the light, fluffy snow with the creamy milk mixture. Gently pour your prepared base over the snow, and use a spoon or spatula to gently fold it together. Be careful not to stir too hard, as this could cause the snow to melt and lose its fluffy texture, resulting in more of a slushy consistency.
The trick is to gently combine the ingredients, ensuring the base is incorporated while maintaining the light and fluffy texture of the snow. Your goal is a creamy, light, and fluffy consistency. If the mixture feels too thick, feel free to add more milk a little at a time until you achieve your preferred texture.
Perfect the Consistency
It’s important to get the right texture for your snow ice cream! You want it to be thick enough to hold its shape but not so stiff that it’s hard to scoop. Imagine the consistency of classic soft-serve ice cream. If you’d like a firmer texture, simply add more snow until it feels just right.
Don’t worry if the snow begins to melt a bit as you mix—it’s perfectly natural, and the treat will still be delicious! If your snow ice cream melts too much, you can either enjoy it right away as a slushy treat or pop it in the freezer for a while to firm up before serving.
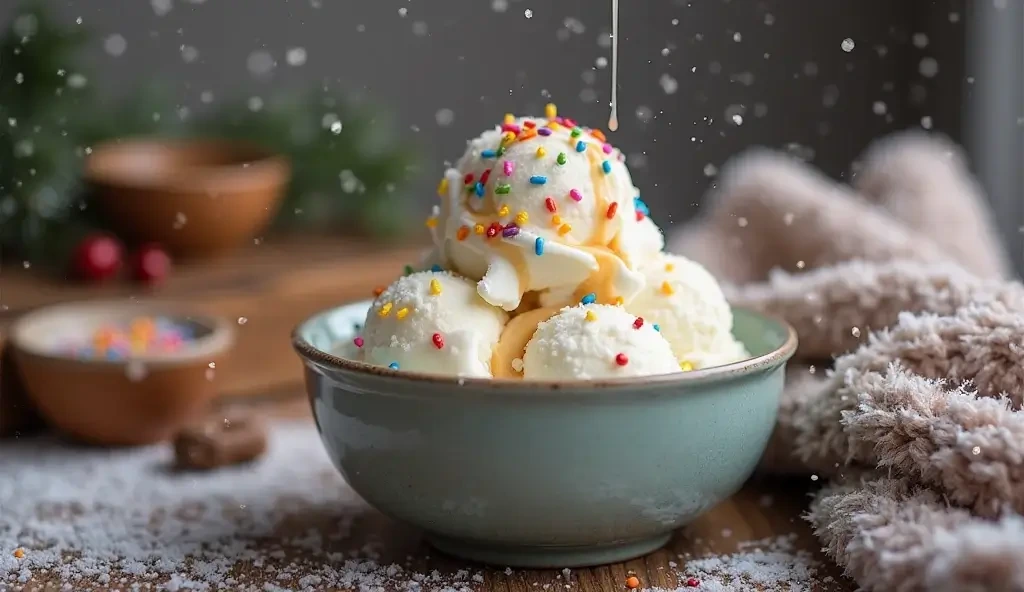
Optional Toppings and Add-ins
Once your snow ice cream is perfectly mixed, you can serve it as-is or get creative with toppings and add-ins! Here are some fun options to enhance your snow ice cream:
- Fresh fruit: Sliced strawberries, blueberries, or banana chunks add a pop of color and natural sweetness.
- Chocolate chips or sprinkles: A sprinkle of chocolate chips or colorful sprinkles brings a fun and festive element.
- Crushed cookies or candy: For extra texture, sprinkle crushed cookies like Oreos or bits of candy for some crunch.
- Whipped cream: Top it off with a swirl of whipped cream for a creamy finishing touch.
- Syrups: Drizzle on chocolate, caramel, or maple syrup to elevate the flavor.
Feel free to mix and match toppings to make your snow ice cream uniquely yours! Adding extras like these can turn your treat into something extra special.
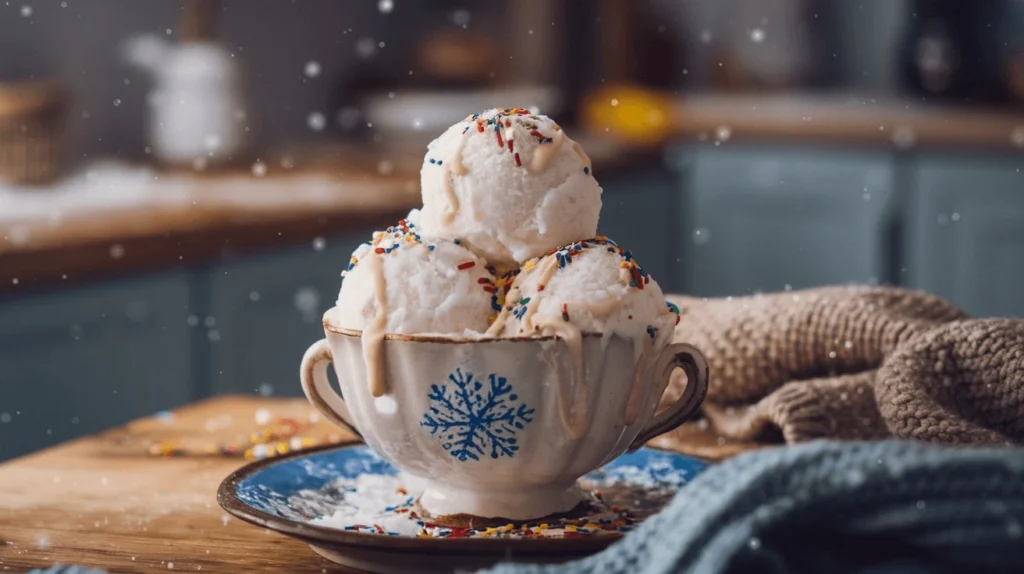
Serving and Enjoying
Once everything is combined, it’s time to serve! Scoop your snow ice cream into bowls or small cups for an easy serving. If you’re entertaining a group, consider creating a snow ice cream station where everyone can customize their serving with their favorite toppings.
Because snow ice cream is best enjoyed fresh, it’s recommended to serve it right after mixing for the most satisfying texture. If you have leftovers, store them in an airtight container in the freezer for a few hours. Keep in mind that the texture may change as it sits in the freezer, so you might need to let it sit out for a few minutes before scooping again.
Why It’s So Quick and Easy
What makes snow ice cream so amazing is how quickly and easily it comes together. With just a few basic ingredients and some fresh snow, you can whip up a fun, instant dessert that brings the spirit of winter to life in every bite. It’s the perfect go-to treat for snow days, parties, or any time you’re craving something cool and refreshing made from nature’s ingredients.
With minimal preparation and simple steps, your snow ice cream will be ready to enjoy—quick, tasty, and a hit with all ages!
Flavor Variations and Toppings
Add-ins: Cocoa Powder, Crushed Cookies, or Sprinkles
One of the best parts about making snow ice cream is how customizable it can be. While the base of milk, sugar, and vanilla is delicious on its own, adding fun mix-ins takes your snow ice cream to the next level, allowing you to get creative with flavors and textures. Whether you’re looking for a little chocolatey richness, a crunchy bite, or a pop of color, here are some tasty add-ins you can incorporate into your snow ice cream:
Cocoa Powder: For a Chocolatey Twist
If you love chocolate, adding a bit of unsweetened cocoa powder to your snow ice cream base can turn it into a rich, indulgent chocolate treat. Cocoa powder adds deep, intense flavor without being overly sweet, so it pairs perfectly with the natural sweetness of the snow ice cream base.
To add cocoa powder:
- Stir about 2 to 3 tablespoons of unsweetened cocoa powder into your milk, sugar, and vanilla mixture before adding it to the snow.
- If you prefer a sweeter chocolate ice cream, consider adding a little extra sugar to balance the bitterness of the cocoa.
For an even more decadent treat, you can also stir in chocolate chips or mini chocolate chunks after combining the snow and the base. This gives your snow ice cream a creamy chocolate flavor with an added bit of texture from the chips!
Crushed Cookies: Adding Crunch and Flavor
For those who love a little crunch with their creamy ice cream, crushed cookies are a great addition. Whether it’s classic Oreos, chocolate chip cookies, or even graham crackers, adding cookies brings texture and flavor that contrasts beautifully with the softness of the snow ice cream.
Here’s how to use crushed cookies:
- Take about 4 to 6 cookies (depending on how cookie-heavy you want it) and crush them into small pieces or crumbs.
- Once the snow and milk base are combined, gently fold the cookie crumbs into the mixture, ensuring they’re evenly distributed throughout.
For a cookies-and-cream-style snow ice cream, Oreo cookies are an excellent choice. You can also use other cookies for different flavor profiles—gingersnaps for a spiced twist or peanut butter cookies for a nutty flavor.
Sprinkles: A Fun and Colorful Touch
Sprinkles are a fantastic way to add a festive, colorful flair to your snow ice cream. Whether you’re making this treat for a special occasion or just for fun, a generous handful of sprinkles can turn your simple snow ice cream into an eye-catching dessert.
Here’s how to add sprinkles:
- After combining the snow and base, simply sprinkle rainbow sprinkles, chocolate sprinkles, or holiday-themed sprinkles over the top of your snow ice cream.
- You can also mix some into the base before folding it into the snow, creating pockets of colorful sweetness throughout the dessert.
Sprinkles don’t just add color—they also provide a delightful crunch that contrasts nicely with the creamy texture of the snow ice cream. This simple addition makes the dessert feel more fun and festive, perfect for kids’ parties or any occasion where you want to bring a little joy.
Other Add-ins to Try
Don’t limit yourself to just cocoa powder, cookies, and sprinkles! Here are a few other delicious add-ins you can experiment with:
- Mini marshmallows: Soft, chewy bites that add sweetness and texture.
- Chopped nuts: Almonds, peanuts, or pecans give a crunchy, nutty flavor that pairs well with the creamy snow base.
- Candy pieces: M&M’s, crushed candy canes, or even crushed-up chocolate bars can make fun additions for a sweet, crunchy twist.
- Fruit: Fresh or freeze-dried fruit like berries, mango, or banana chips can bring a fruity burst to your snow ice cream, adding a refreshing contrast to the rich creaminess.
Tips for Mixing Add-ins
When adding mix-ins, it’s important to fold them gently into the snow and base mixture to avoid melting the snow too much. The goal is to distribute the add-ins evenly without losing the fluffy texture of the snow. If you prefer, you can also reserve some add-ins to sprinkle on top as a final garnish for extra texture and flair.
By using your favorite add-ins, you can tailor the flavor and texture of your snow ice cream to match your cravings, creating a treat that’s as unique as you are!
Healthier Twist: Dairy-Free or Low-Sugar Options
While traditional snow ice cream is a sweet and creamy treat, you can easily adjust the recipe to make it a bit healthier by swapping out a few ingredients. Whether you’re looking for a dairy-free alternative or a lower-sugar version, there are plenty of ways to customize your snow ice cream without sacrificing flavor. Here are some ideas for making a guilt-free snow ice cream that suits different dietary needs:
Dairy-Free Options
For those who are lactose intolerant, vegan, or simply looking to reduce dairy consumption, it’s easy to make a dairy-free snow ice cream by substituting the milk with plant-based alternatives. The good news is that there are many milk substitutes that work perfectly in this recipe, offering a similar creamy texture without the dairy.
Some great dairy-free milk alternatives include:
- Almond milk: Light and slightly nutty, almond milk gives a subtle flavor that complements the sweetness of the snow.
- Coconut milk: Rich and creamy, coconut milk adds a tropical flair to your snow ice cream with its velvety texture.
- Oat milk: Naturally sweet and creamy, oat milk is a fantastic option for those looking for a dairy-free choice that mimics the thickness of cow’s milk.
- Cashew milk: Known for its smooth texture and neutral taste, cashew milk provides a nice creamy base for your snow ice cream.
To maintain the same sweetness and texture as the traditional version, you can use unsweetened versions of these plant-based milks. If you prefer a sweeter flavor, simply add a bit of maple syrup, agave nectar, or your preferred sweetener.
Low-Sugar Snow Ice Cream
If you’re looking to enjoy snow ice cream without all the sugar, there are a few simple swaps you can make to create a lower-sugar version. The great thing about snow ice cream is that it doesn’t need a ton of sugar to taste good—you can easily control the sweetness with a few adjustments.
Consider these alternatives for a lower-sugar version of your snow ice cream:
- Natural sweeteners: Swap out regular sugar for natural sweeteners like Stevia, monk fruit sweetener, or erythritol. These options are low in calories and don’t spike your blood sugar.
- Coconut sugar: For a more natural alternative with a lower glycemic index, coconut sugar adds a mild caramel flavor and is a great substitute for refined sugar.
- Honey or maple syrup: If you prefer a more natural sweetener, honey or maple syrup are great alternatives. Just be sure to use them sparingly to avoid adding too much sugar.
- Fruit sweeteners: Another fun option is to blend in pureed fruits like bananas or applesauce for natural sweetness. This also gives your snow ice cream a slightly fruity flavor and extra nutrients.
You can also cut back on sugar by reducing the amount in the base recipe. Since the snow itself provides some natural sweetness, you may find you don’t need as much added sugar. Adjust the sweetness gradually to achieve the ideal flavor balance.
Lower-Calorie Variations
If you’re counting calories but still want to indulge in a delicious treat, there are simple ways to make snow ice cream a lower-calorie option:
- Skip the whipped cream: While whipped cream is a delicious topping, it adds extra calories and fat. Instead, try topping your snow ice cream with a light sprinkle of cocoa powder, cinnamon, or toasted coconut flakes for flavor without the extra calories.
- Add more fruit: Fruits like strawberries, blueberries, or mangoes not only add natural sweetness but also come with fiber and vitamins. They make excellent, nutritious toppings for your snow ice cream.
- Use fewer add-ins: While add-ins like crushed cookies and candy are fun, they can quickly add up in calories. Opt for a smaller amount of crunchy toppings or go for healthier options like chia seeds or coconut shavings.
By making a few simple substitutions, you can enjoy a much healthier version of snow ice cream that still feels like a fun treat!
Combining Healthier Options for a Perfect Dessert
Feel free to combine multiple healthier alternatives for a customized treat. Feel free to combine both dairy-free and low-sugar options for a dessert that aligns with your dietary preferences and still delivers a sweet, indulgent taste. You can also add in extra toppings like unsweetened coconut flakes, chia seeds, or even a drizzle of dark chocolate for a little extra flavor without the added sugar.
Snow ice cream is versatile enough that you can make it fit into any lifestyle, whether you’re following a dairy-free, low-sugar, or calorie-conscious diet.
By swapping a few ingredients, you can easily make a health-conscious version of this nostalgic winter treat that still tastes amazing. Whether you’re indulging in a sweet treat or sticking to your health goals, snow ice cream can be adapted to fit your needs!
Creative Flavors: Strawberry, Mint, or Caramel Drizzle
While the classic vanilla flavor of snow ice cream is delightful, there’s so much room for creativity! One of the best parts about making your own snow ice cream is that you can experiment with unique flavors that take this simple treat to the next level. From fruity to minty to indulgently sweet, there are endless possibilities for adding flavor twists that make your snow ice cream even more exciting and fun. Here are some creative ideas for flavoring your snow ice cream:
Strawberry Snow Ice Cream
For a refreshing, fruity twist, consider adding fresh strawberry flavor to your snow ice cream. Strawberries are naturally sweet and pair beautifully with the creamy base of milk and sugar. Try this simple method to make snow ice cream with a burst of strawberry flavor:
- Fresh strawberry puree: Blend fresh strawberries into a smooth puree and gently fold it into the snow and milk mixture. It adds a bright hue and a refreshing, fruity kick to your snow ice cream.
- Strawberry jam or syrup: If you prefer a sweeter and more concentrated flavor, mix in a spoonful of strawberry jam or syrup. It will add both flavor and a lovely pink hue to your treat.
- Fresh strawberries as topping: For added texture and a burst of flavor, top your snow ice cream with sliced fresh strawberries. You can even sprinkle a bit of powdered sugar over the top to elevate the presentation.
Strawberry snow ice cream is perfect for a light, refreshing dessert during the warmer months or for those who love a natural fruity flavor.
Mint Snow Ice Cream
Mint brings a crisp, refreshing taste that complements the airy, delicate texture of snow ice cream beautifully. The crisp, herbal flavor of mint gives your snow ice cream an extra burst of freshness, making it an ideal dessert for hot days or after a heavy meal. Here’s how to make mint-flavored snow ice cream:
- Use a small bunch of fresh mint leaves and blend them into your milk mixture for natural flavor. For a smoother flavor, you can puree the mint with a little milk and then strain it to remove the leaf particles before adding it to your snow.
- Mint extract: If you don’t have fresh mint on hand, a few drops of mint extract will do the trick. Start with just a few drops to avoid overpowering the taste.
- Chocolate chips or crushed candy canes: For extra minty indulgence, stir in some chocolate chips or crushed candy canes. These add a fun crunch and make the mint flavor even more delightful.
Mint snow ice cream is ideal for anyone who loves the combination of refreshing mint and creamy textures, and it can even double as a festive treat for the holidays.
Caramel Drizzle Snow Ice Cream
For those with a sweet tooth, adding a rich caramel flavor to your snow ice cream is a surefire way to elevate your dessert. The sweet, buttery taste of caramel pairs perfectly with the fluffy snow, creating a luscious treat that’s irresistible. Here’s how to incorporate caramel into your snow ice cream:
- Caramel sauce: Drizzle store-bought or homemade caramel sauce into your milk mixture for a smooth, sweet flavor. You can also add a few spoonfuls directly into the snow for extra caramel sweetness throughout the ice cream.
- Caramel extract: For a more intense caramel flavor, a small amount of caramel extract can be added to your base. This will provide a deep, caramelized taste without the need for heavy syrup.
- Caramelized sugar: If you’re feeling adventurous, you can make your own caramelized sugar and fold it into the snow. This adds both texture and an intense, deep caramel flavor that will impress your guests.
Enhance your caramel snow ice cream by adding a little extra caramel sauce on top, or sprinkle with a pinch of sea salt for a delicious salted caramel variation. This blend of sweet and salty is ideal for anyone craving a rich, decadent flavor experience.
Mixing and Matching Flavors
One of the best parts about making snow ice cream is that you can get as creative as you want! Feel free to experiment with different flavor combinations to craft a unique dessert that suits your taste. Some fun combinations to try include:
- Mint and chocolate: Add crushed chocolate chips to mint snow ice cream for a mint chocolate chip flavor.
- Strawberry and vanilla: For a classic, summery twist, swirl in a little vanilla extract with your strawberry puree.
- Pair smooth caramel with a touch of chocolate syrup for an indulgent and flavorful treat.
Fun Toppings to Complement Flavors
Along with the creative flavors, you can elevate your snow ice cream with unique toppings that match the flavors you’ve chosen. Here are some ideas:
- Strawberry shortcake topping: Top strawberry-flavored snow ice cream with crushed shortbread cookies or a sprinkle of granola for a shortcake-inspired treat.
- Minty chocolate drizzle: Add a drizzle of chocolate syrup and a few mint leaves to your mint-flavored snow ice cream for a double punch of minty freshness and rich sweetness.
- Caramel popcorn: If you’re making caramel snow ice cream, why not add a little crunchy caramel popcorn on top for texture and extra flavor?
By adding these fun and creative flavor options, you can transform your simple snow ice cream into a delightful dessert that suits every palate. Whether you’re in the mood for fruity, minty, or sweet caramel, the possibilities are endless! Plus, experimenting with flavors is a fun way to make your snow ice cream truly unique.
Snow Ice Cream FAQs & Storage Tips
How Long Does Snow Ice Cream Last?
Snow ice cream is an incredibly fun and fast treat, but when it comes to storing it, it’s important to note that its shelf life is relatively short. Unlike traditional ice cream, which is made with stabilizers and preservatives to maintain its texture and flavor, snow ice cream is more delicate due to its main ingredient—fresh snow. This leads to some unique considerations when it comes to storing and enjoying your creation.
Immediate Consumption is Best
The best advice for snow ice cream is to enjoy it right after making it. Since snow ice cream is made from fresh, fluffy snow and mixed with a milk-based or cream base, it tends to melt quickly. As it melts, it can lose its smooth, creamy texture and become icy and slushy. For this reason, it’s recommended to serve and eat it immediately after mixing to get the full enjoyment of its refreshing, light texture.
Can You Store Snow Ice Cream?
If you have leftovers or want to store your snow ice cream for later, it’s possible—but the texture will likely change. Here’s what you need to know:
- Short-term storage: You can place leftover snow ice cream in an airtight container and store it in the freezer for up to 2 to 4 hours. However, after this period, the texture may become more solid and icy, losing its creamy consistency.
- Long-term storage: If you try to store snow ice cream for more than a few hours, you’ll find that it turns into a hard block of icy snow. To revive it, you can let it sit at room temperature for a few minutes to soften it up a bit, but it may not return to its original fluffy texture.
Tips for Storing Snow Ice Cream
- Avoid refreezing: Once snow ice cream has started to melt, it’s best not to refreeze it. Freezing and thawing will change the texture and might make it unpleasant to eat.
- Use a shallow container: When storing snow ice cream in the freezer, use a shallow, wide container. This will allow the ice cream to freeze more evenly, minimizing the chance of clumping.
- Check for changes in texture: Over time, as snow ice cream sits in the freezer, you may notice the snow’s light, airy texture giving way to a denser, more crystallized form. This is normal, but it can affect the overall experience of eating the ice cream.
Best Enjoyed Fresh
Ultimately, snow ice cream is meant to be a fun, impromptu dessert that captures the joy of freshly fallen snow. Its short shelf life is part of its charm! So, while you can store it for a short period of time, the most delicious experience is having it fresh, right after it’s made. It’s a perfect treat for spontaneous snow days, outdoor gatherings, or any time you want to celebrate the magic of winter with a sweet, chilly snack.
Can You Refreeze Leftover Snow Ice Cream?
While it’s always tempting to save some leftover snow ice cream for later, it’s important to understand that refreezing snow ice cream isn’t ideal due to its unique composition. Snow ice cream is made by mixing fresh snow with a milk or cream-based mixture, and as such, it has a delicate, light texture that is prone to changes when frozen and thawed multiple times.
What Happens When You Refreeze Snow Ice Cream?
When you refreeze snow ice cream, the texture undergoes noticeable changes. Here’s what happens:
- Loss of Creaminess: Initially, snow ice cream has a fluffy, creamy consistency. However, once it melts and is refrozen, the fluffy snow crystals turn into larger, harder ice crystals. This can result in a grainy, icy texture that’s far from the smooth, soft treat you originally enjoyed.
- Separation of Ingredients: As the ice cream melts, the milk or cream base may start to separate from the snow, causing a less appealing, uneven texture when refrozen. This separation can lead to a watery or thin consistency once you thaw the snow ice cream again.
- Flavor Changes: The flavor of snow ice cream can also be affected by refreezing. When the snow melts and refreezes, it can cause the milk and sugar to crystallize in a way that alters the sweetness or overall taste, leading to a less enjoyable dessert experience.
How Long Can Snow Ice Cream Sit Before Refreezing?
If you’ve made snow ice cream but didn’t finish it all in one sitting, you might be wondering if it’s safe to store it and refreeze it. If you plan to keep any leftover ice cream, here are some tips:
- Short-term refreezing: If you’ve only let the snow ice cream sit for a few minutes and it hasn’t melted significantly, you might be able to refreeze it temporarily for a short period (e.g., a few hours).That being said, it’s best enjoyed right away for the freshest, creamiest texture.
- Extended storage: If your snow ice cream has melted completely or sat out for too long, refreezing is not recommended. Once the ice cream has fully melted and been stored, its texture will be too compromised, and it won’t return to its original state.
Why It’s Best to Avoid Refreezing
Refreezing snow ice cream can be tempting, especially if you want to extend the enjoyment of this winter treat. However, it’s important to remember that snow ice cream is meant to be a quick, fresh dessert. Its light, airy texture is best enjoyed immediately after preparation. Refreezing changes the integrity of the dessert, often making it less appetizing.
What to Do with Leftover Snow Ice Cream?
If you do have some leftover snow ice cream and don’t want to refreeze it, here are a few alternatives:
- Serve it as a slushy treat: If the snow ice cream has started to melt, you can serve it as a fun slushy dessert. This way, you can enjoy the flavors without worrying about texture loss.
- Mix it into smoothies: Leftover snow ice cream can be blended into a winter smoothie, giving you a new way to enjoy the flavors while masking any changes in texture.
- Use it as a topping: You can also use leftover snow ice cream as a topping for cakes, pies, or even as a garnish for hot chocolate. The change in texture won’t be as noticeable in these applications.
The Bottom Line
In short, refreezing snow ice cream is not recommended if you want to preserve its ideal texture and taste. Snow ice cream is at its best when freshly made, and although you can store it for a short time in the freezer, it’s best to enjoy it immediately. If you must store it, try to keep the portion sizes small to avoid wasting the precious freshness of this fun winter treat!
What’s the Best Way to Serve Snow Ice Cream on a Snow Day?
Snow ice cream is a perfect treat for snow days! There’s something magical about enjoying a cold, creamy dessert made from freshly fallen snow while cozying up inside or playing in the snow. Whether you’re gathered around the kitchen with loved ones or having fun outside, here are some ideas to make serving snow ice cream on a snow day even more special.
Serve It Fresh and Fun
The best part about snow ice cream is that it’s instant fun! The whole process of gathering fresh snow and mixing it with a sweet base can turn into an enjoyable family activity. Here’s how to make the experience even more memorable:
- Gather Snow Together: If you have a group, get everyone involved in the snow-gathering process. It’s a fun, collaborative activity that will make the treat even sweeter when everyone enjoys the fruits of their labor.
- Add a Personal Touch: Create a snow ice cream bar where everyone can customize their dessert. Set out bowls of toppings like chocolate chips, crushed cookies, sprinkles, and fresh fruit, so each person can make their own perfect bowl of snow ice cream.
- Serve in Fun Containers: Use colorful bowls, mason jars, or even ice cream cones for a playful, snow-day vibe. You can even make it feel like a mini winter party by using small clear cups and allowing everyone to serve themselves!
Turn It Into a Snowy Celebration
On a snow day, snow ice cream can become more than just a snack—it can be part of a fun, themed experience. Here are a few ideas to turn your snow ice cream into a highlight of the day:
- Make it a Snow Day Tradition: If you live in a snowy area, snow ice cream can become a tradition that kids look forward to every winter. After playing outside or building a snowman, come inside for a delicious homemade snow ice cream treat.
- Host a Snow Day Party: If you’re home with family or a group of friends, consider having a little “snow day party.” You can set up a hot cocoa bar alongside your snow ice cream station, offering people the chance to enjoy both cold and warm treats. Include whipped cream, marshmallows, and flavored syrups to make the experience even more indulgent.
- Winter-Themed Activities: Combine your snow ice cream with other fun snow day activities. After making your snow ice cream, you can enjoy a cozy winter movie marathon or have a snowball fight in the yard. It’s a great way to keep the fun going all day long.
Creative Serving Ideas
Get creative with how you serve snow ice cream to make it feel even more festive:
- Serve with Toppings: Let everyone customize their snow ice cream with fun toppings like whipped cream, chocolate syrup, sprinkles, and even a drizzle of honey or caramel. Fresh berries, sliced bananas, and crushed candy bars can elevate the flavor and make it more indulgent.
- Mini Snow Ice Cream Sandwiches: For a fun twist, you can create mini snow ice cream sandwiches by placing small scoops of snow ice cream between two cookies. This makes it easy to eat and adds an extra layer of flavor and texture to the treat.
- Snow Ice Cream Sundaes: Create a snow ice cream sundae bar with all sorts of fun toppings like crushed Oreos, chocolate chips, crushed nuts, and marshmallows. You can also offer a variety of sauces, from chocolate to caramel or even fruit syrups, for endless customization.
Enjoy It as a Quick Break
One of the best parts of snow ice cream is how quick and easy it is to make, so it’s the perfect treat for those little breaks between outdoor snow activities. After a snowball fight or sledding session, take a short break and enjoy some snow ice cream to recharge before heading back outside for more winter fun. It’s a refreshing and energizing treat that gives you a moment to relax without too much effort.
Warm It Up with Hot Drinks
Nothing complements the cold, refreshing taste of snow ice cream quite like a warm drink. To make your snow ice cream experience even more cozy, pair it with hot beverages like:
- Hot Chocolate: A classic winter pairing! Serve your snow ice cream with a mug of rich, creamy hot cocoa. You can even add a scoop of snow ice cream to your hot chocolate for a cool, creamy surprise.
- Spiced Cider or Tea: If you prefer a less sugary drink, try pairing your snow ice cream with a warm mug of spiced apple cider or herbal tea. The flavors will complement each other and create the perfect balance of hot and cold.
Make It a Creative Winter Craft
Snow ice cream can also be a hands-on activity for kids that brings out their creativity. You can encourage them to experiment with different flavor combinations, or use food-safe dyes to create colorful snow ice cream, making it a fun craft to enjoy before the treat. You could even encourage children to help decorate their bowls or mix in sprinkles or chocolate shavings for a fun snowy design.
Embrace the Season
Finally, serving snow ice cream on a snow day is the perfect way to embrace the beauty of the winter season. It’s a way to connect with nature, make the most of the snowy weather, and enjoy a treat that’s as fun as it is delicious. Whether you’re outside playing in the snow or cozy inside by the fire, snow ice cream makes every snow day feel special.
Conclusion: A Winter Treat Worth Trying
Making snow ice cream is as easy as it is fun. With just a few ingredients—fresh, clean snow, milk, sugar, and vanilla—you can whip up a creamy, dreamy dessert in minutes. Simply gather the snow, mix your base, combine everything gently, and top it off with your favorite add-ins like cocoa powder, sprinkles, or fruit.
Whether you’re looking for a cozy activity on a snow day or a nostalgic winter treat to share with family, this recipe is sure to bring smiles all around. It’s quick, customizable, and perfect for all ages!
Give it a try the next time snow blankets your yard—and let the fun begin!
Tried this recipe? I’d love to hear how it turned out! Let me know in the comments, or tag me in your photos on social media.